How to Install MacOS Sonoma on a Mac

The upgrade to MacOS Sonoma is well worth it for nearly all Mac users running macOS Ventura since it refines the operating system quite a bit, and could be a compelling upgrade for Mac users running Monterey and earlier versions too. With some great new features like desktop widgets, amazing new screen savers and wallpapers, Game Mode, Safari Profiles, and much more.
So, ready to take the plunge and install MacOS Sonoma on your Mac? Let’s walk through how to do exactly that.
Requirements for Installing MacOS Sonoma
- First, backup your Mac with Time Machine or your backup method of choice – do not skip this, you do not want to lose data
- Second, makes sure your Mac is compatible with MacOS Sonoma, basically any Mac newer than 2018 is supported, you can see the full compatibility list here
- Third, make sure you have at least 30GB of available disk space to be able to install MacOS Sonoma
- Fourth, make sure your have internet access, and the time necessary to install a major system software update, which usually takes an hour or so to complete
Got your requirements cleared and out of the way? Perfect, then let’s install MacOS Sonoma on your Mac!
How to Install MacOS Sonoma Upgrade on a Mac
Don’t forget to backup your Mac before beginning the Sonoma upgrade process.
- Go to the Apple menu in the top left corner of the Mac
- Select “System Settings” (or System Preferences, if running an earlier macOS version)
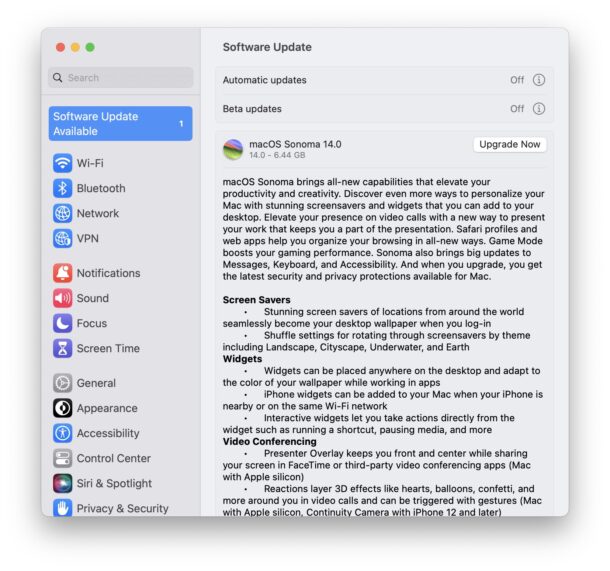
- Go to “General”
- Select “Software Update”
- When MacOS Sonoma 14.0 shows as available, choose “Uprade Now” to begin downloading and installing MacOS Sonoma onto the Mac
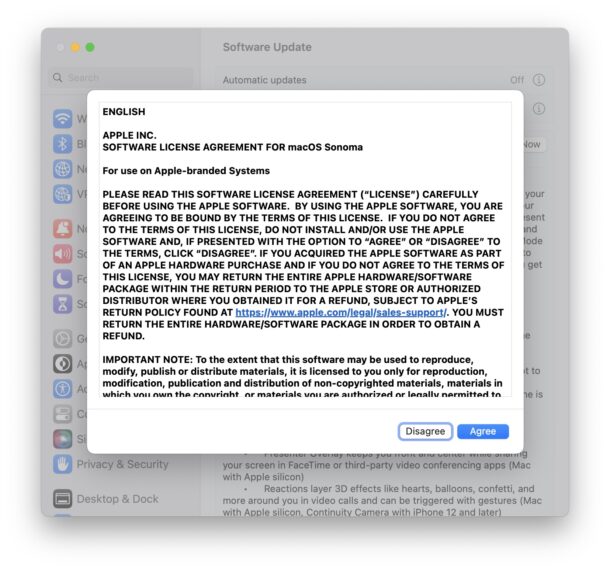
Agree to the terms of service (which you will read very carefully as we all do, studying the material late into the wee hours of the night).
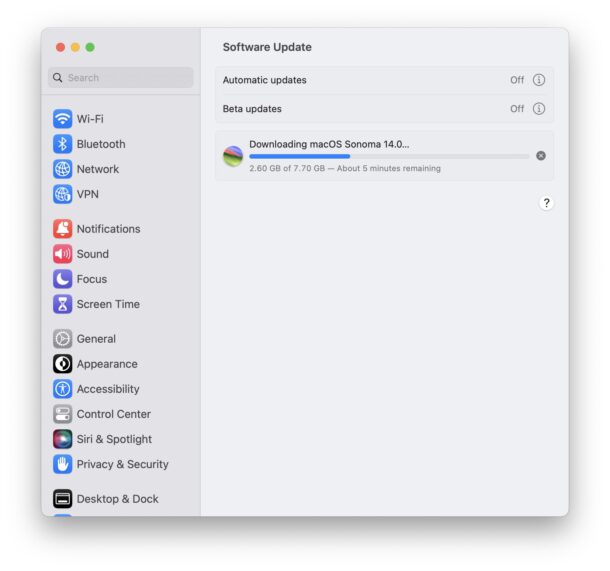
MacOS Sonoma will begin to download through System Settings:
When the Sonoma upgrade has finished downloading, the Mac will restart automatically and go into a software update screen.
Upgrading from Ventura to Sonoma looks like installing a regular system software update, but it takes a little longer, and after restarting and updating firmware your Mac will boot again as usual.
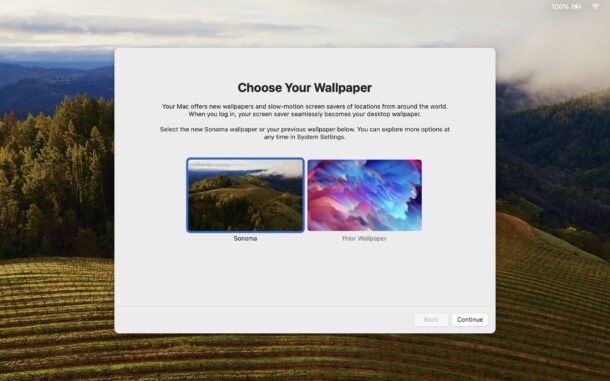
On first boot into MacOS Sonoma after the upgrade, you will be presented with a screen that asks you to select your wallpaper as either the new default in MacOS Sonoma, or your existing wallpaper. Of course you can change this at anytime in Apple menu > System Settings > Wallpaper.
Make your choice, and away you go, to enjoy MacOS Sonoma.
If you’re running macOS Monterey or earlier, the update will look slightly different, and be available through System Preferences as mentioned earlier. Regardless, once the download has finished, the Mac will want to automatically restart and begin the installation process for MacOS Sonoma.
If you’re coming from macOS Ventura or Monterey, then Sonoma installs like any other macOS system update, whereas if you are coming from an earlier version of macOS, or you’re using the downloaded MacOS Sonoma installer, then you’ll go through the installer application, choosing a destination disk, and proceeding that way.
Now that you’re running MacOS Sonoma, don’t miss out on the best new features in MacOS Sonoma, and keep reading OSXDaily to find more tips and tricks, as always!
Note: this process covers installing MacOS Sonoma from the Software Update mechanism as an upgrade. However, you can also download MacOS Sonoma as an InstallAssistant.pkg file, or you can go here to download the installer or see an updated list of full installers for all versions of macOS that are available, including whatever updates arrive as well.
Of course, if you’re not quite ready to upgrade to MacOS Sonoma, you can prepare ahead of time, or you can wait for a later version and postpone the update as well. If you decide to postpone the Sonoma upgrade, you’ll want to learn how to install macOS updates to Ventura/Monterey without installing Sonoma so that you maintain the latest security patches on your computer. What you do with your Mac system is entirely up to you.
Have you installed MacOS Sonoma yet? What do you think of Sonoma and the fun new features like widgets and the amazing new screen savers? Share with us in the comments below.

What is everybody complaining about? This is actually a good version of OS. Everything is working from file sharing, all the apps and even rsync backup is working again. Ive installled it on a 2009 27″ iMac via OpenCore and thats much faster and everything works and all hardware is supported
I agree, Sonoma is way better than Ventura was. Apple usually releases macOS on a tick-tock cycle; with the tick breaking things and being crappy (Ventura) and the tock fixing things and being better (Sonoma). This has been the case with many other macOS updates too over time… Leopard to Snow Leopard, Lion to Mountain Lion, Ventura to Sonoma, etc etc
Now I wish Apple would fix File Sharing. Worked well before Sonoma. It also kills syncing of my password manager from Mac to Mac but that still works Mac to iOS. A search yields many people with this same issue and dozens of “fixes”, none of which work.
Running 14 on a M1 with 16Gb RAM, its much better
Somehow, the opportunity to add widgets and screen savers does not inspire me to go through the learning curve of a new OS version.
What I would REALLY like to see is improvement to the flow of old utilities like Contacts, and Bookmarks in Safari, not to mention the “Save As” locations – things which I use everyday.
I don’t really even see the screen saver! Either I am working with my MacBook or I am away from my desk.
Screen flickers after Sonoma upgrade
Probably caused by duplicate color profiles.
On 2023-10-17, after upgrading to Sonoma on Mac mini with M1 chip, I, too, had screen flickering. I found another user had the same problem and resolved it by deleting the duplicate files in ~/Library/ColorSync/Profiles/.
I did this too, and the problem ceased. [See this link:](https://discussions.apple.com/thread/254863490?answerId=259057938022#259057938022/)