How to Add Vignette to Pictures in Photos for Mac OS X
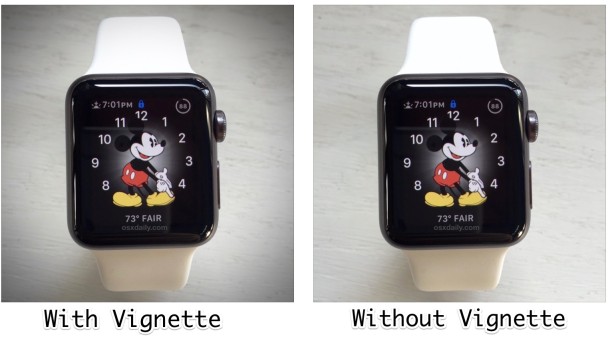
You can add a nice vignette effect to any picture, image, or photo kept in the Photos app on the Mac. The vignette tool allows for adjustments and customizations for the strength of the pictures vignetting effect, which is basically a dark soft border along the edges of a picture intended to draw the viewers focus to the center of a picture. The vignette effect is easy to use, but it’s a little hidden in the OS X Photos app, buried within the adjustment settings.
We’ll show you how to add a vignette effect to any image or picture within Photos for Mac.
Adding & Adjusting Vignette Effect on Photos for Mac
- Open Photos app and double-click the picture you wish to add a vignette to, if the picture isn’t in Photos yet, just drag and drop the picture into the Photos app to add it to Photos library
- Click on the “Edit” button in the upper right corner
- Choose “Adjust” from the Edit menu that appears on the right side of the screen
- Click the “Add” button in the upper right corner of the Adjustments screen
- Select “Vignette” from the drop down menu
- Adjust the Vignette settings in the adjustment sidebar, changing the following:
- Strength: adjusts how dark / strong the vignette effect is
- Radius: adjusts the size of the vignette effect
- Softness: adjusts how abrupt the vignette appears and disappears on the image
- When satisfied with your photos vignette adjustments, click on “Done” in the upper right corner

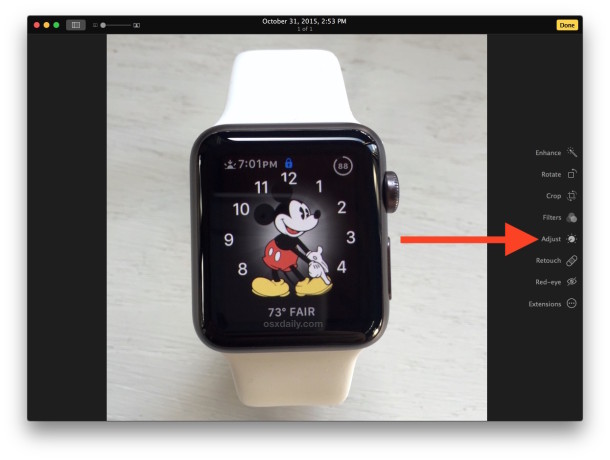
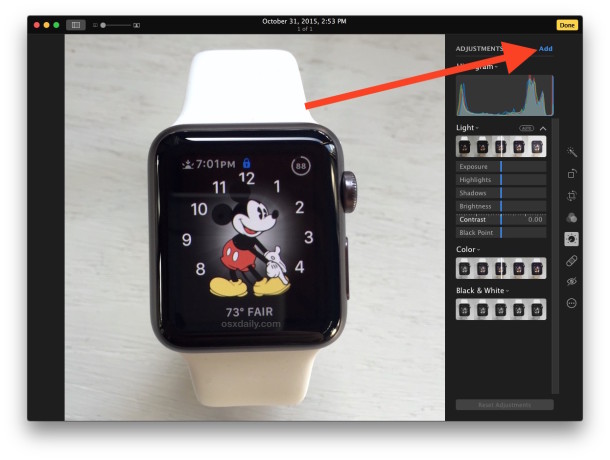
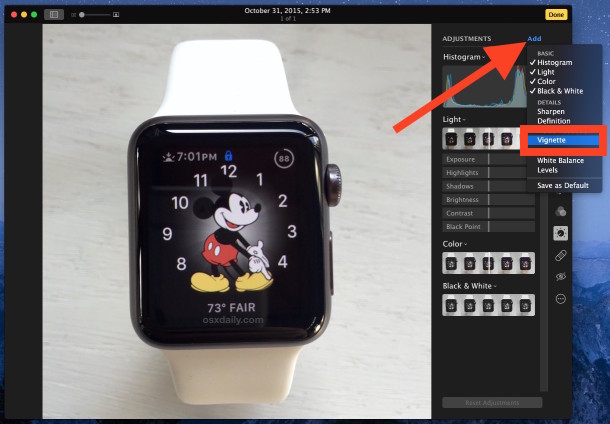
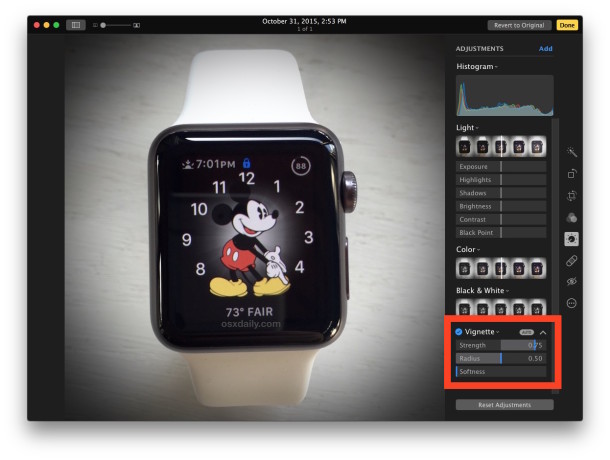
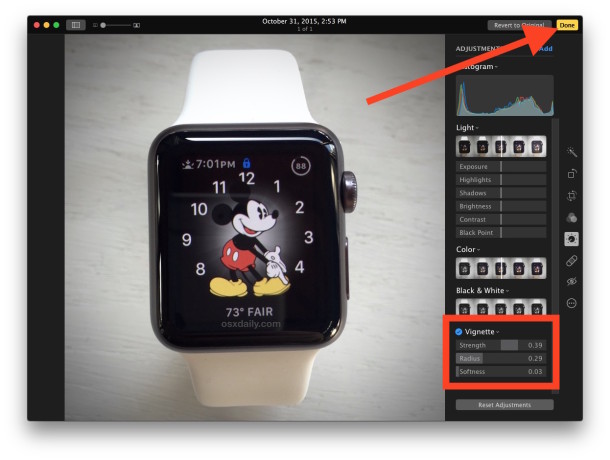
That’s it, your photo now has a vignette on it!

Here’s what a picture looks like with and without vignette effects:
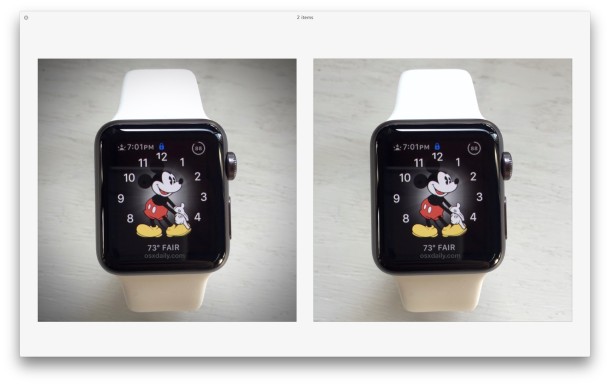
To save the picture outside of Photos app, the easiest way is often to just drag and drop the picture onto the desktop, otherwise you can use the Photos app sharing button (the box with an arrow flying out of it) to save the vignetted picture to elsewhere, or share it on a social service. Another option is to locate the picture on the Mac with “Show in Finder” to reveal the modified file itself.


photos 6.0 doesn’t have an add button.
Thank you for writing this tip which helped me figure out how to use the adjust to create a matte, which like vignette, was another effect missing from Photos. This was the one reason I was unable to migrate from iPhoto to Photos. I actually don’t use vignette but matte, which is the same but is a white border instead of a darkened border. To get a whitened vignette (a matte) follow the same instructions here but make the strength negative instead of positive. The key reason to use a matte is to be able to lighten a background to white, but not overlighten. By adding a white matte you get a pure white frame, and can then light the photo slightly until areas that should be pure white in the photo merge into the matte area.
Brady,
Not sure you’ll get this, but ran across your post from Apr 1, 2017 about creating a matte (white) frame in photos. I tried your suggestion, though was not happy with results. I’ve used iphoto 8.2.1 forever and for thousands of photos, using both the quick matte and vignette feature on that for photos I post to a website. It provided an easy quick “finish” touch depending on whether I wanted the white or black, but now with photos … it sucks! On High Sierra …. found anything new regarding this? Thanks. Don
I see no difference in either of those watch faces, at the very least the effect is not very noticeable with this image.
So it adds a circular shadow…………..
Amazing? I, guess.
I prefer the picture without it, TBH.
That took me way to long to realise
scratch my comment..
like everyone else, i was looking at the picture in the watch.. but it’s the picture itself, not the watch.. raaaggghhhhh
Thanks Andre! Your comment is the one that made me see what vignette means
and thanks to Paul Horowitz for posting this tip!
There is hardly any difference to see, none if you just look at it
The point would have been made better with a lighter clear picture, not a picture that already has a vignette effect in it
I don’t see no difference.
You should have chosen a light image, not a dark one, to better illustrate the effect.
Wow!, April the first has come round quick.
OMG, everybody is looking at Mickey Mouse, not the outside edges of the whole picture.
LOL, it’s like nobody read the article.
Vignette is very much a photography term, but don’t look at Mickey Mouse, it’s the border of the picture, not the middle! That’s the point
And I still cannot detect any difference (viewing on a 5k iMac).
Oops, taken yet another look and now I can :-)
That’s a very poor photo. I cannot see the difference even after you explain the difference. Perhaps a better photo with adjustments made to the exposure would help.
I feel like I’m looking at one of those old “Find the Difference” pictures in the children’s magazine at the doctor’s office. Are we supposed to see a difference between those two pictures?
Don’t look for the effect on the watch face, it’s on the outer edges of the picture itself where you’ll see a dark hue in the four corners. This was a bad picture to use as like me, most would think its about changing the picture on the watch itself, not the picture of the watch.
A vignette effect is intentionally subtle, it appears as a shaded border on images that intends to draw the eye into the center of a picture.
https://en.wikipedia.org/wiki/Vignetting
The subject of the picture should not look different, it’s the details surrounding the subject that is less emphasized to bring out the center subject.
I don’t see ANY difference either, LOL!
agree, you have got to be kidding that this is worth spending time to read. I want my two minutes back. lol
I should say that the sissy faux-photoshoplike app FREE pic monkey has the ‘shadowed’ vignette effect for any pic. For me, vignette is about a 1 on a scale of 10 for wow effects that are striking. It is about the equiv of putting up curtains around the window view. Now if the timepiece could change the halo color, make it patterned, carry a motto in it, that might be different.
Great story ‘ark’ I bet you are a really helpful person with all sorts of great ideas for pictures, judging by your comment you must be the expert of Photoshop.