The newly announced Apple TV runs iOS, despite not having the traditional iOS interface, according to a report on TUAW. Citing an iPhone developer who went digging around in the latest iOS 4.2 beta, it was found that ‘AppleTV2,1’ was listed in the latest USB device configuration files. Assuming this holds true, the new $99 Apple TV will surely be a hit with iOS jailbreakers and the mod community.
It is widely believed that the new Apple TV is basically an iPod touch sans screen and with a smaller storage capacity. Although not confirmed, it’s assumed that the new device has 4GB to 8GB of local storage capacity, which would be adequate to store necessary files and cache streamed media and movies.
You can trim any MP3 file for free in Mac OS X thanks to the bundled QuickTime Player app, which comes preinstalled on every single Mac. Though we’ll cover trimming MP3’s, it turns out you can actually use QuickTime to trim just about any audio file, as the app supports many more other audio formats too. So, if you want to quickly trim down an audio file in Mac OS X without downloading any other apps or software, read on, it’s a piece of cake and works with all versions of Mac OS X.
MAMP is a great app for Mac OS X that lets you quickly and easily run an entire pre-configured web server on top of Mac OS X, it’s really helpful and I use it frequently for web development and testing web projects. Perhaps the only issue with MAMP is the port settings, which by default they are set to 8888 and 8889, so instead of being able to visit localhost you have to load localhost:8888.
Thankfully this is easy to change, and you can quickly configure MAMP to use the default ports for Apache and MySQL, allowing you to interact with localhost without specifying an additional port number. This settings adjustment in MAMP is simple:
If you’re wondering how the iPod touch 4G competes against the rest of Apple’s iOS lineup, this video shows the boot time of the currently relevant devices; the newest iPod touch 4G, iPhone 4, iPad, and iPhone 3GS (sorry iPhone 3G, you’re slow with iOS 4 anyway).
Here’s the breakdown of the iOS boot times:
iPad: 19.04 seconds
iPod touch 4G: 26.4 seconds
iPhone 4: 28.64 seconds
iPhone 3Gs: 32.8 seconds
Interesting that the iPad is so much faster, and then somehow the iPod touch is quicker than the more powerful iPhone 4… moseying along at the end is the iPhone 3GS at a still respectable speed. The more I learn about the new iPod touch the more I think it’s a great deal.
Notice they didn’t even bother testing the iPhone 3G, probably because the “3G” now stands for the 3000 seconds it takes to perform any task since iOS 4 doomed the older iPhone hardware into oblivion (ok on a serious note if your iPhone 3G is terribly slow, get the iOS 4.1 download, it does help a bit).
There’s a few other videos over at AppleInsider if you’re curious, they compare the iPod touch cameras and displays to the iPhone 4. It’s probably not too surprising to learn that the iPhone 4 has a better camera and display though, thanks to the IPS screen and higher megapixels.
If you’re a registered iOS developer you can now download the iOS 4.2 beta. This is pretty exciting news because iOS 4.2 runs on the iPad which has been waiting patiently for iOS 4 and it’s multitasking and folder support to arrive for much of the year.
Of course the update is not limited to the iPad, iOS 4.2 beta also runs on the following hardware: iPad, iPhone 4, iPhone 3GS, iPhone 3G, iPod touch 2nd gen, iPod touch 3rd gen, iPod touch 4th gen
If you’re not a developer, you’ll have to wait for the final release of iOS 4.2 which is due in November and will finally unify the iOS releases across Apple’s mobile devices.
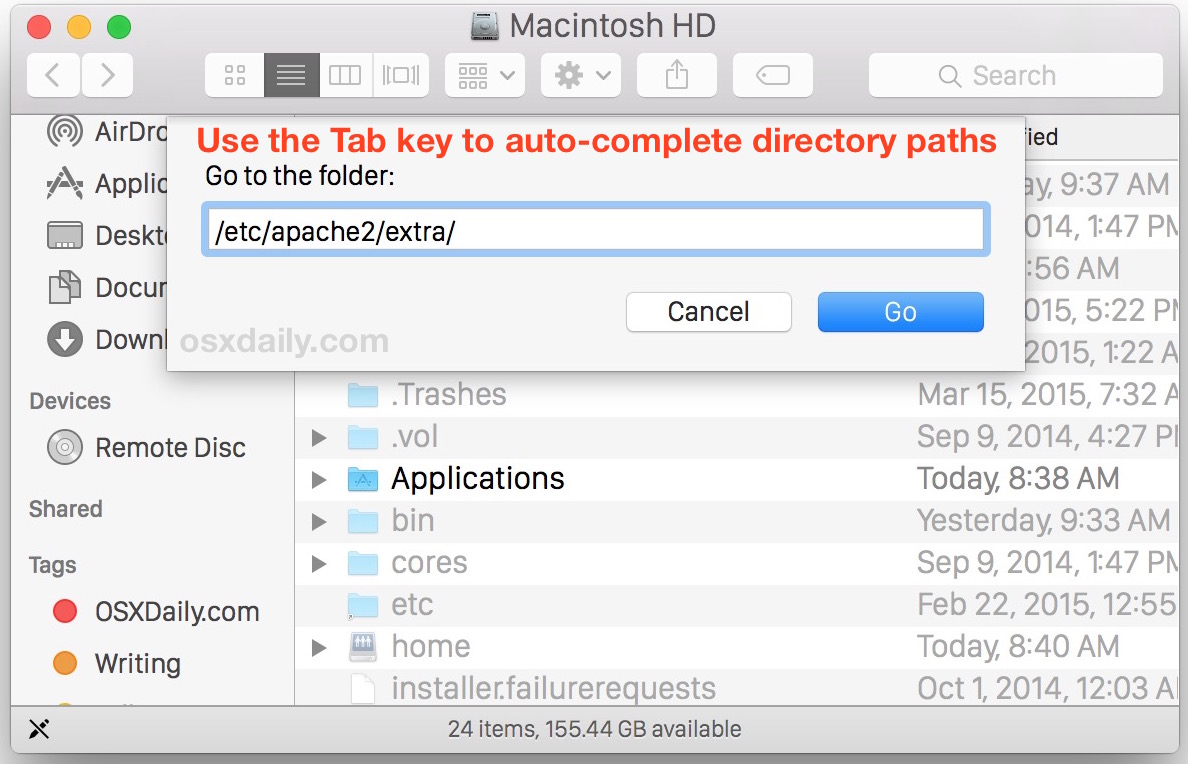
You can use the tab key to auto-complete paths within Go To Folder on the Mac, a particularly handy trick to keep in mind the next time you’re navigating directory paths on the Mac.
Tab key auto-completion is a feature that many command line users are familiar with, particularly those with a unix and linux background. Of course, the Mac OS X command line features tab completion as well, but much lesser known is that the excellent “Go To Folder” screens of the Mac also support tab completion.
It’s easy to wind up with an overwhelming number of Safari web browser windows open on a Mac (or Windows too). If you’re like me you tend to have a million browser windows open at the same time, as you read, browse, and research things around the web. This can make it really difficult to keep track of sites that are open and finding things can be difficult as you get lost in the sea of windows.
Thankfully Safari has a great feature that lets you merge all of the open windows into tabs within a single browser window.
Did you know that you can download and watch the Freakonomics movie right now? The theatrical release is October 1 for limited screenings and November 1 for widespread distribution, but why wait? All you need to do is jump on the iTunes Store and you can download and watch Freakonomics right now. The HD rental is $10.99 or $9.99 for standard def, considering it’s a pre-release movie and cheaper than a movie date anyway that’s not too shabby.
In case you don’t know, this is a documentary based on the book Freakonomics which came out a few years ago and explores some interesting relationships and links between seemingly unrelated events and trends. I read the book a while ago and didn’t find any of the data particularly ‘freaky’ but it certainly was a fascinating read, the documentary looks to be just as interesting.
Having pre-release movies available for online rental with iTunes seems to be a new trend that the movie industry is exploring, and one I am certainly not complaining about. How cool is it to watch movies before they’re even in the theaters and in the comfort of your own home? Of course you could also get it on your iPad or iPhone, but I say fire up that Mac Mini media center and start watching!
Have you ever wondered what the top 100 apps on the App Store have in common? Surely there are some similarities, something these successful apps share that made them so popular, but what is it? How about just asking the users what they liked or disliked? Read more »
You can completely change the appearance of iTunes 10 by running the application in something called High Contrast Mode, which effectively inverts the list display so that the text is white on black (see the screenshot, it’s a very pronounced change).
To enable High Contrast Mode, enter the following command into the Terminal: defaults write com.apple.iTunes high-contrast-mode-enable -bool TRUE
You can revert the changes back to the normal iTunes 10 appearance with the following: defaults write com.apple.iTunes high-contrast-mode-enable -bool FALSE
For whatever reason since updating to iOS 4.0 Pandora has been misbehaving on both my iPhone and iPod touch. If you haven’t run into this basically what happens is a few songs will play normally before they start to skip and stutter, for some songs it almost sounds like it’s part of the song, but the more you listen the more the song skips. Finally the app will either crash or the song will stop playing completely, very annoying.
So how do you stop the songs being played in Pandora from skipping randomly? Get ready for it:
Delete the app and reinstall the newest version.
This might seem like common sense, but not everyone thinks to do this since the app may have worked just fine (it did) on a prior iOS version. Read more »
This is another hilarious commercial for an iPad app, and points out why the iPad won’t be completely replacing a newspaper anytime soon, at least for some tasks. Dubbing itself as ‘better than a newspaper in all kinds of ways’ the commercial pokes fun at another traditional usage of rolled up trees: fly swatting.
If you want to see another great app ad, check out iPad Buddy & Steve Young football. It’s really interesting to see commercials popping up for ads in the iOS ecosystem, but I guess it’s not too surprising. I’m also amused at the different approach the app advertisers are taking, focusing more on humor than on the user experience, which is a stark contrast to what Apple does in ads like their new iPad commercial.
There’s a lot of hooplah in the web world about Google Instant and it’s ability to turn up search results immediately while you type them. Is Google Instant really as new and revolutionary as it’s claimed to be? Yes and no. Yes for the web, and no for computing. You know what other prominent search engine has been providing instant and predictive search results based on user input? Apple’s very own Spotlight. Read more »
Mac OS X warns users in a variety of different ways if they have downloaded a file from the internet to their Mac, with a popup message that says something along the lines of “[NAME] is an application downloaded from the internet. Are you sure you want to open it?”, or even “this application can’t be opened” – both are a precautionary measure aimed at preventing more casual users from inadvertently launching something malicious or unintended. While this is a great feature for many mac users to keep on, some advanced users may be annoyed with it.
Apple may be readying the release of a new iPad in time for the holiday shopping season, according to a report. The refreshed iPad is expected to be equipped with a FaceTime compatible camera and the new iPad iOS 4.2. The report from AppleInsider also suggests that Apple is looking to get FaceTime compatibility on all Apple mobile products before opening the standard to the rest of the world.
Assuming the report holds true, the new iPad may be released at the same time that iOS 4 will come to the iPad as iOS 4.2 in November. The new OS will bring long awaited features such as multitasking and folder support to the device.
FaceTime is expected to come to Mac OS X’s very own iChat in the near future as well, and possibly even to Windows through another chat client. Other rumors surrounding a refreshed iPad suggest the device may sport dual-cameras, additional RAM, larger storage options, and even a higher resolution retina display.
If you have multiple screens or a larger screen resolution it can be nice to play Starcraft 2 in windowed mode. In case you didn’t know, windowed mode basically means the game is contained within a standard application window rather than running in full screen.
Starcraft 2 Windowed Mode Shortcuts
Both the Windows and Mac OS X versions of Starcraft 2 can be played in window mode:
Mac OS X: Command+M
Windows: ALT+Enter, or switch to Windowed mode by adjusting the Display options from the Menu screen
There is probably a keyboard shortcut for Windows too, but I spend most of my time playing in Mac OS X.
Parallels is pretty great software that lets you easily run Windows apps on Mac OS X. The latest version was just announced and is faster than ever with full 64-bit support, it retails for $79.99 which isn’t a bad price but why pay more when you don’t have to? I like a good deal, so here’s how to get the newest version, Parallels 6, for $20 (well, actually $19.99). This will work until September 30 when the rebate is no longer offered.
That’s all there is to it! This deal works by taking advantage of the Parallels Tech Guarantee, which states that if you buy a qualifying purchase of Parallels 5 after the eligible dates (August 15, 2010), you will get a free upgrade to version 6 when it is released:
Buy a qualifying Parallels Desktop 5 for Mac product from an authorized reseller or from www.parallels.com starting August 15th, 2010 and you will be eligible upgrade to Parallels Desktop 6 for Mac at no additional cost when it becomes available on September 14.
Save your Parallels Desktop 5 for Mac dated sales receipt, register your product and activation key at https://www.parallels.com/account/ and keep your activation key in a safe place. Bookmark this page and come back once Parallels Desktop 6 for Mac has been released in your language.
Great software at a great price, can’t beat that.
Update: This deal is still active, you have until November 30th, 2010 to buy Parallels 5 and then get a free upgrade to Parallels 6. This is a great deal!
Here’s the date range from Parallels:
Customers who bought a retail box or download version of Parallels Desktop 5 for Mac or Parallels Desktop Switch to Mac Edition from an authorized reseller between August 15th, 2010 and November 30th, 2010 need to proactively claim their upgrade directly with Parallels


 For whatever reason since updating to iOS 4.0 Pandora has been misbehaving on both my iPhone and iPod touch. If you haven’t run into this basically what happens is a few songs will play normally before they start to skip and stutter, for some songs it almost sounds like it’s part of the song, but the more you listen the more the song skips. Finally the app will either crash or the song will stop playing completely, very annoying.


 Parallels is pretty great software that lets you easily run Windows apps on Mac OS X. The latest version was just announced and is faster than ever with full 64-bit support, it retails for $79.99 which isn’t a bad price but why pay more when you don’t have to? I like a good deal, so here’s how to get the newest version, Parallels 6, for $20 (well, actually $19.99). This will work until September 30 when the rebate is no longer offered.