Did you accidentally ignore a Software Update in MacOS or Mac OS X and now you need to install it on a Mac? Perhaps you were putting off a specific update for one reason or another, and now it’s time to install that ignored or hidden update again onto Mac OS X.
Fortunately, getting the ignored updates back is really easy, as we will walk you through several different procedures that allow you to reset the ignored software updates list. You can do perform this task either though the Mac App Store, from the Command Line of Mac OS X with Terminal app, or for prior versions of system software, the older Software Update app. You can use whichever method is appropriate for your machine and version of Mac OS, or whichever you prefer.
If you use FileVault and QuickLook on a Mac you may want to know that the combination of the two may leak some sensitive information from encrypted volumes.
Reader Jack R. sent in the following tip, explaining the situation further:
When FileVault and QuickLook are used concurrently, information about what files are stored on the encrypted volume becomes available and completely unencrypted on your hard drive. This is due to QuickLook’s thumbnail caching that is stored within the /var/ directory.
Run the following command to see the size of the QuickLook cache to demonstrate the potential:
find /var/folders -name "*QuickLook*" -exec du -h {} \; 2>/dev/null
The worst case scenario is the potential for exposing file names and even QuickLook thumbnails of documents and images. There’s also a sqlite file called index.sqlite within the /var/folders QuickLook cache directories that have a list of file names on the encrypted volumes.
Whether or not this is a legitimate security hole that is patchable or if it’s something I’m aimlessly worried about, I don’t know, but I am willing to bet many people don’t know about this!
Editor note: This definitely seems like a security hole. I imagine the best way to avoid this problem is to just not use QuickLook on the sensitive encrypted data, although that’s more of a workaround than a fix. Perhaps Mac OS X will eventually get a security update to resolve the problem.
Update 6/18/2018: Over 8 years later, this security bug still exists in MacOS / Mac OS X! That’s the bad news. But here’s the good news; security researcher Patrick Wardle has brought some renewed attention to this flaw and thus it will likely get patched in a future software update.
In the meantime, Wardle recommends the following command string to delete the Quick Look cache, which can be entered into the Terminal of MacOS / Mac OS X:
qlmanage -r cache
Executing that command will clear the Quick Look cache. Keep an eye out for future security updates and software updates to Mac OS as they will likely patch the bug once and for all.
CNN Money posted the results of a consumer survey that has some really interesting facts about the iPhone and AT&T. The most amazing claim is the percentage of people who are committed and loyal to the iPhone versus those who own Androids. Here are the important figures:
77% of iPhone owners say they’ll buy another iPhone
Only 20% of Android customers say they’ll buy another Android phone
73% of iPhone users are very satisfied with AT&T’s service
69% of overall smartphone users say they are satisfied with their mobile provider
Phone owners pay $12/mo more for service than the average smartphone user
iPhone is worth $1.8 billion in sales to AT&T this year, and will generate $9 billion in revenue for the provider over the next five years
Obviously the iPhone is a cash cow for AT&T, even if it is also heavier maintenance due to it’s users increased data consumption. AT&T gets a lot of vocal complaints about their service, but the survey shows that despite the woes of the vocal minority more iPhone users are satisfied than smartphone users are overall with any mobile provider.
How’s this working out for the other providers? According to the article “Verizon has been regretting turning away Apple for the last three years” which isn’t surprising considering the huge amount of revenue and loyalty the device inspires. Now whether or not Verizon will get iPhone remains to be seen, but you can bet everyone is fighting for the chance and AT&T is fighting to renew exclusivity.
I would undoubtedly buy another iPhone and recommend them to anyone, I’ve used several Android devices and I’d even consider them the ‘next best’ smartphone, but given the choice between the two devices I will always choose an iPhone – the user experience is just so much better and the iPhone is just, well, cooler.
Apple has started the free iPhone 4 case or bumper program, if you’re an iPhone 4 owner it’s a simple process to claim a free case or get a refund from a past purchase.
Launch the app on your iPhone and sign in using your iTunes/Apple ID
Select your free Bumper or Case
To qualify for the free bumper or case, you must apply to the program within 30 days of buying an iPhone 4, until September 30 when the program expires.
The free iPhone 4 bumper and case program is offered in response to the antenna problems that some users have reported experiencing with iPhone 4, which has received a large amount of media attention and subsequently been parodied to death.
The release date of the White iPhone 4 model has been pushed back again, as Apple continues to face difficulties manufacturing the device. The following statement was issued today regarding the matter:
White models of Apple’s new iPhone® 4 have continued to be more challenging to manufacture than we originally expected, and as a result they will not be available until later this year. The availability of the more popular iPhone 4 black models is not affected.
There is no word on what ‘later this year’ means in terms of a definitive release date, but this is the second production delay that the White iPhone 4 model has encountered. This comes at a time when even black iPhone 4 availability is already strictly constrained due to huge demand for the device.
White iPhone 4 Popularity
Perhaps most interesting about the white iPhone delays is that the inability to get the device seems to be driving up it’s popularity. The following chart is from Google Trends, showing the search volume of ‘White iPhone 4’ vs ‘Black iPhone 4’ – as you can see the device deemed more popular by Apple (the black iPhone) is significantly less searched for than the unavailable white model.
Although it’s unlikely to be Apple’s intention, it would seem the production challenges with the white model are actually driving up the devices desirability. In the past, the Black iPhone has been more popular than the White iPhone, but perhaps that will be changing?
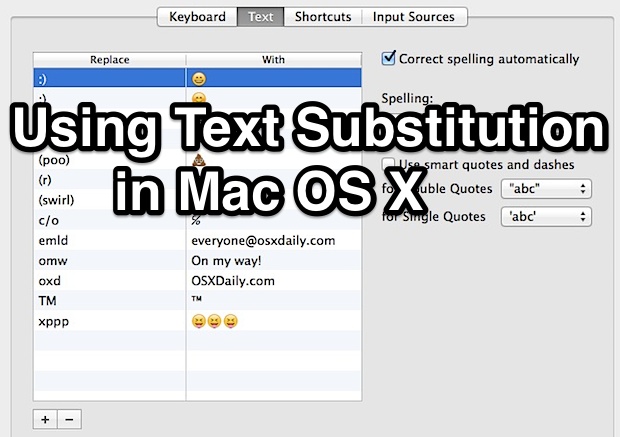
Using Text Substitution, you can easily write any special character or symbol like ™ or ® just by typing something like TM or (r). It can also be used to expand long phrases or particular words by typing shorter abbreviations, for example you could type “myeml” to instantly type out an email address, and it can also be used to quickly type out emoji rather than digging around in Character menus.
Everything is automated and the options are unlimited, in that you can have as many text replacement substitutes as you want setup. Getting this working is quite simple, but you’ll find that some apps in past versions of Mac OS also need the ability to use the substitutions enabled individually, not to worry, we’ll cover that as well.
A report based on patent findings shows the continued interest of an ad supported operating system that may be in the works at Apple. AppleInsider shows several of the patents mockups demonstrating a desktop operating system that looks very much like Mac OS X, except there are advertisement features included in it. Perhaps the most interesting part of the patent filing is the idea that the ads will disable functionality of the OS while you view them:
“The operating system can disable one or more functions while the advertisement is being presented… At the end of the advertisement, the operating system can again enable the function(s). The advertisement can be visual or audible. The presentation of the advertisement(s) can be made as part of an approach where the user obtains a good or service, such as the operating system, for free or at reduced cost.”
The last part about the ads subsidizing the cost of the operating system is fascinating too. Will any of these ‘features’ be mandatory in Mac OS X 10.7? I hope not. I don’t know about anyone else but I’d much rather just pay for an OS than have ads as part of my core desktop experience. Of course, Apple has many patents filed and not every idea that is patented is actually used, so take this information with a grain of salt for now.
Rumors of the iPhone jumping to a US provider outside of AT&T continue to swirl as Apple’s exclusivity contract with AT&T looks to expire this year. First it was iPhone + Verizon and now it’s iPhone + T-Mobile.
The report on CultOfMac says the expansion of iPhone into T-Mobile USA is 80% certain to occur in Q3 this year. The addition of T-Mobile would undoubtedly boost iPhone market share as the device would be available to a potential 33 million customers.
Other than the exclusive contract inked between AT&T and Apple, the other hurdle to bring iPhone to other networks is technology. Verizon is based on CDMA which would require a redesign of the iPhone. Moving the iPhone to T-Mobile would be relatively easy from a technological standpoint since both AT&T and T-Mobile use the same GSM technology which the iPhone is built for. The report notes that T-Mobile already has thousands of iPhone’s on it’s US network, thanks to carrier unlocks.
In the USA, whether you buy iPhone with or without contract, it is locked onto AT&T’s network. The only way to use it with another cell provider is to use a jailbreak and carrier unlock.
iTunes Smart Playlists are a widely underused feature in iTunes, which is a shame because it’s a powerful way to create custom playlists based on a variety of parameters, including artists, genres, dates, ratings, play counts, and more.
I’m often guilty of only listening to whatever is newest in my iTunes playlist since I’m usually pulling music from variousnewmusic blogs. But what about all the music that I was listening to a few months ago? Sure you can select shuffle, but why not take it a step further… create a smart playlist! Go to the File menu and down to “New Smart Playlist” and set your parameters and off you go.
I got the idea for this a while ago after reading a nice article on The Apple Blog which walks us through the process of creating a smart playlist based on music age and skip count, allowing you to build a music playlist based on what you used to listen to and liked. Definitely a nice way to rediscover your older, and still enjoyable music.
The countdown to the Starcraft 2 release date closes in, July 27 is less than a week away and it’ll be available for Mac and PC users. This is really exciting for RTS fans like myself, and I’m especially happy that Blizzard is going for a concurrent release for both Windows and Mac OS platforms. Be sure that you meet the Starcraft 2 system requirements for Mac so that you can enjoy the game, they’re pretty reasonable so most people who bought a Mac over the last couple of years should have no problem running the game.
Apple is on fire, with record third quarter revenue of $15.7 billion. How does this translate into actual hardware sales? Here’s a breakdown:
3.47 million Macs sold, a new sales record and an increase of 33% year over year
8.4 million iPhones sold, 61% growth year over year
9.41 million iPods sold, a 8% decline year over year
3.27 million iPads sold since launch this year
That’s a lot of hardware. Other interesting facts pertain to the near relentless demand of new products, which has caused iPhone 4 availability to be constrained tightly as demand is still through the roof nearly a month after launch. Apple’s COO Tim Cook had the following to say about iPhone 4:
“Let me be very clear on this: We are selling every unit we can make… Demand for iPhone 4 is absolutely stunning.”
This is stating the obvious for anyone actually trying to buy iPhone 4, stores continue to sell out of the device the moment they’re in stock. It’s not just the iPhone that is dealing with tight supply lines though, the iPad is also struggling to find equilibrium as Apple continues to sell every model it makes. Very impressive.
Letting Time Machine run on a routine backup schedule is important for all Macs, but there also times where you’ll want to initiate a backup yourself, like before installing system updates or major Mac OS X upgrades. If you find yourself needing to initiate a manual Time Machine backup, you’ll be happy to know it is very easy to initiate. Let’s get to it.
These are the Mac system requirements for running Starcraft 2:
Minimum Starcraft 2 System Requirements for Mac
These are the baseline specs that you’ll need to run the game, if you are near the lower end of the settings here you probably won’t have great performance.
Mac OS X 10.5.8, 10.6.2 or newer
Intel Processor
NVIDIA GeForce 8600M GT or ATI Radeon X1600 or better
12 GB available disk space
1 GB RAM (2 GB highly recommended)
DVD drive
Broadband Internet connection
1024X768 minimum screen display resolution
Recommended Starcraft 2 System Requirements for Mac
In addition to the system specs above like available disk space and an internet connection, to run Starcraft 2 the best on your Mac these are the recommended specifications:
Intel Core 2 Duo processor
4 GB system RAM
NVIDIA GeForce 9600M GT or ATI Radeon HD 4670 or better
Obviously the better and newer your Mac, the better Starcraft II will perform on it.
Want to quickly end a phone call on iPhone 4? No problem, just press this self-installed End Call button decal! OK I doubt this would work, and in fact it would probably prevent the bars and calls from dropping, but it’s amusing nonetheless.
We just got this picture in our inbox, the sender didn’t provide a source but the picture is definitely funny. It looks like it’s supposed to be a parody of something available on the Apple site and I highly doubt it’s actually for sale (of course, knowing the internet it will probably become available for sale soon).
Personally I find the iPhone 4 antenna hooplah to be overblown media hype, but some of the jokes and iPhone 4 humor floating around is just hilarious.
Update: the decal is the work of talented designer Aaron Draczynski, thank you to those who tracked this down.
One of the subtle features to iOS that I find myself using really often is the ability to compress photos sent from the iPhone, typically by email. If you’ve ever emailed a picture from an iPhone you’ve probably seen the compression screen, it looks something like this:
Have you ever tried to run a command line tool to discover that you don’t have the necessary privileges to use it? Or perhaps the command itself actually requires root access to run at all? You’ll typically experience this with a ‘permission denied’ type of error message in terminal. Rather then type out the entire command string again, or hit the up arrow and move the cursor over to precede the command with sudo, you can use an awesome trick which re-runs the last executed command with sudo privileges. Best of all, this great re-run last command as root trick works in MacOS / Mac OS X and Linux.
The iPad has a beautiful screen, there’s no doubt about it. What’s not so beautiful is the glare that you get with a glass screen, and while some users can deal with the glare indoors in most situations, when working with an iPad outdoors it’s pretty difficult to maneuver in such a way that the glare isn’t distracting. Sure, you can clean the iPad screen and crank up the brightness on the screen and that helps a bit (but to the detriment of battery life), but I went looking for a better solution in the form of a screen cover that will reduce glare and also help get rid of the finger prints.
 If you use FileVault and QuickLook on a Mac you may want to know that the combination of the two may leak some sensitive information from encrypted volumes.

 Apple has started the free iPhone 4 case or bumper program, if you’re an iPhone 4 owner it’s a simple process to claim a free case or get a refund from a past purchase.