How to Set Up an AirTag on iPhone & iPad
Have you picked up a few AirTags to keep track of all your accessories? In that case, you may be curious about how you can set them up and add them to the Find My network. There’s nothing to worry about since it’s pretty easy.
Apple is entering a completely new product segment with AirTags. For those who haven’t been keeping up with the news, AirTags are small, button-shaped tracking devices that work with the Find My network. You can put an AirTag in your bag, add it to your keychain, or even attach it to your pet’s collar. Basically, no matter where you put it, you’ll be able to track it using your Apple devices. AirTags are pretty affordable too, with a 4 pack of AirTags running $99, so you can put them on all sorts of things you might want to keep track of and not worry too much about the expense.
Considering this is an all-new product, many users wouldn’t be familiar with the setup process. That’s exactly why we’re here to help. In this article, we’ll guide you on how to set up an AirTag on your iPhone and iPad.
How to Set Up an AirTag on iPhone & iPad
To be able to use AirTags, your iPhone or iPad must be running iOS 14.5/iPadOS 14.5 or later. Bluetooth must be turned on and a strong Wi-Fi or cellular connection is required too. Also, make sure that Find My is enabled on your device. Now, let’s take a look at the steps:
- After unboxing your AirTag, the first thing you need to do is remove the plastic wrap and pull the tab to activate the battery on the device. A lot of people tend to keep the wrap on to protect the shiny look, but this will prevent you from using your AirTag.
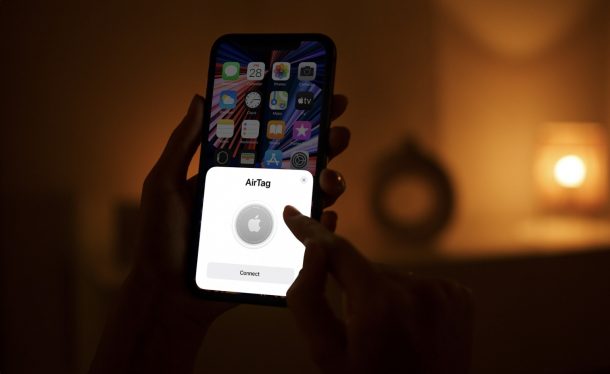
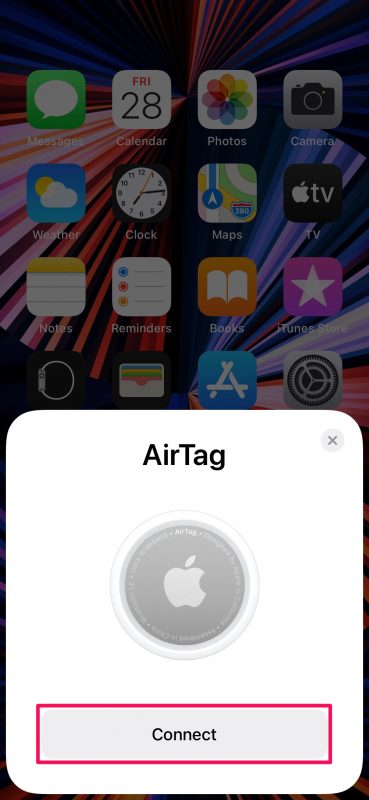
- The next step is to bring the AirTag close to your iPhone. Unlock your iPhone and you should get a pop-up when it detects your AirTag as shown below. Tap on “Connect” to get started.

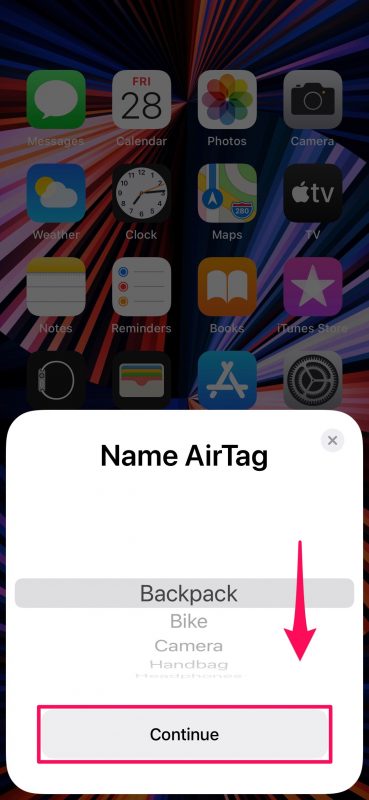
- In this step, you can select what accessory you’ll be using your AirTag with. This will determine the name of your AirTag too. Tap on “Continue” when you’re done with the selection.
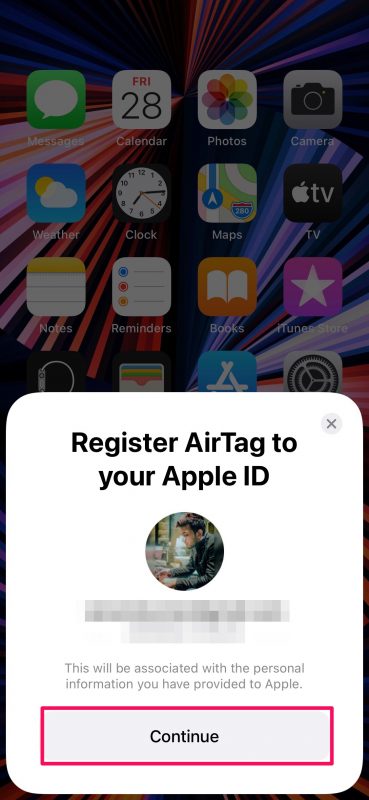
- Now, you’ll see your Apple ID email address and the phone number that will be used to register your AirTag with the Find My network. Just tap on “Continue” to proceed.
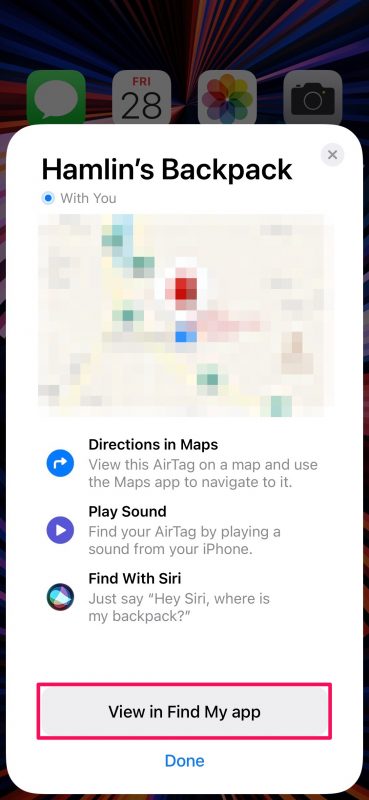
- Now, wait for a couple of seconds until the setup finishes. You should see the following screen when it’s done. Next, tap on “View in Find My app”.
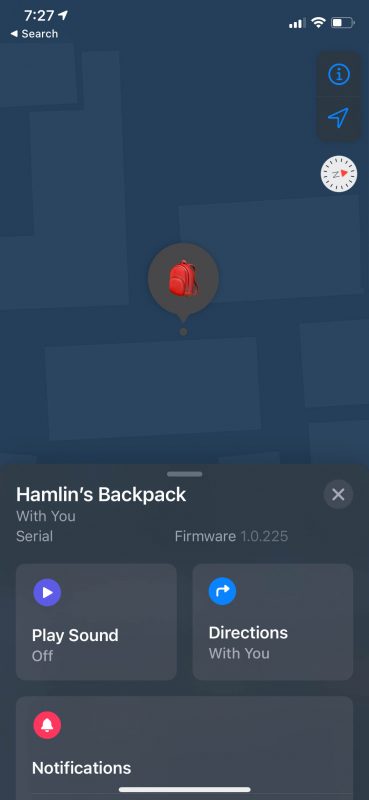
- This will launch the built-in Find My app on your device and show you the exact location of your AirTag on the map. Here, you’ll see its battery percentage and you’ll have access to options like Play Sound, check directions, put it in lost mode, and use notifications, if necessary.
That’s the entire setup process. The accessory you’re using your AirTag with is now safe and secure, thanks to Apple’s Find My network.
You can leave your AirTag untouched no matter where you keep it, but do remember that it’s powered by a battery. As per Apple, the battery on the AirTags lasts one year before it needs to be replaced. Therefore, keep an eye on the battery percentage using the Find My app. AirTags use a CR2032 battery that you can get from a nearby electronics store if you’re wondering about replacements.
If your AirTag is not being detected automatically when you bring it close to your iPhone or iPad, check if both Wi-Fi and Bluetooth are turned on. Still having issues? Still no problem. You can always manually set up and configure your AirTag with the Find My app.
Apart from AirTags, Apple’s Find My service now supports accessories and devices from third-party manufacturers too. You can learn how to add third-party accessories to Find My on your iPhone and iPad if you’re interested as well.
Hopefully, you were able to set up your new AirTags without any issues. What your impression of Apple’s AirTags? What do you use them for? Let us know your individual experiences, drop your personal opinions on the hardware, and share your feedback in the comments section down below.
