Fix Wi-Fi & Internet Connection Problems in macOS Ventura

Some users are reporting wi-fi connection issues and other internet connectivity problems after updating to MacOS Ventura 13. The problems can range from slow wi-fi connections or reconnections, wi-fi disconnecting randomly, or wi-fi not working at all, or internet connectivity not working after updating a Mac to macOS Ventura. Network connectivity issues seem to pop up for some users randomly after installing just about any macOS update, and Ventura is no exception.
We’ll walk through troubleshooting wi-fi connection problems in MacOS Ventura so you’ll be back online in no time.
Resolving Wi-Fi & Internet Connectivity Problems in macOS Ventura
Some of these troubleshooting methods and tips will involve modifying system configuration files, so you should back up your Mac with Time Machine or your backup method of choice before beginning.
1: Disable or Remove 3rd Party Firewall / Network Filtering Tools
If you use third party firewall, antivirus, or network filtering tools, like Little Snitch, Kapersky Internet Security, McAfee, LuLu, or similar, you may encounter wi-fi connection issues on macOS Ventura. Some of these apps may not be updated yet to support Ventura, or may not be compatible with Ventura. Thus, disabling them can often remedy network connectivity issues.
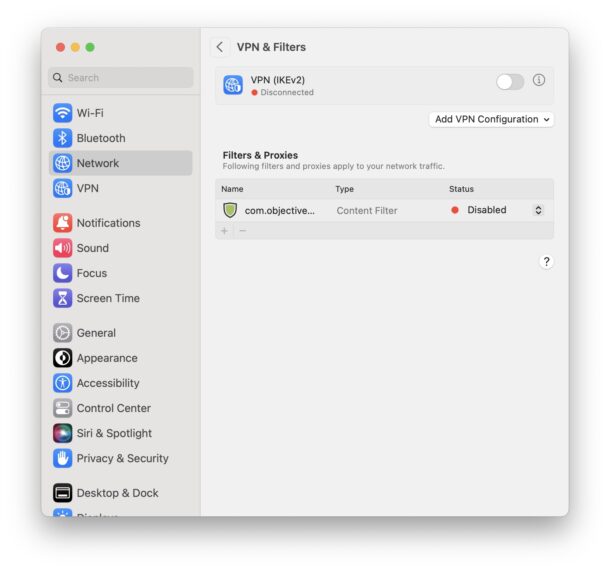
- Go to the Apple menu and choose “System Settings”
- Go to “Network”
- Choose “VPN & Filters”
- Under the ‘Filters & Proxies” section, identify any content filter and either remove it by selecting and clicking the – minus button, or changing the status to “Disabled’

You should restart the Mac for the change to take full effect.
If you rely on third party firewall or filtering tools for specific reasons, you’ll want to be sure you download whatever updates are available to those apps as they become available, since running earlier versions may result in compatibility problems with macOS Ventura, impacting your network connection.
2: Trash Current Wi-Fi Preferences in macOS Ventura & Reconnect
Removing current wi-fi preferences, rebooting, and setting up Wi-Fi again may resolve common networking issues experienced on a Mac. This is going to involve trashing wi-fi preferences, meaning you’ll have to reconfigured any customizations you have made to network TCP/IP or similar.
- Quit out of all active apps on the Mac, including System Settings
- Turn Wi-Fi OFF by going to the wi-fi menu bar (or Control Center) and toggling the wi-fi switch to the off position
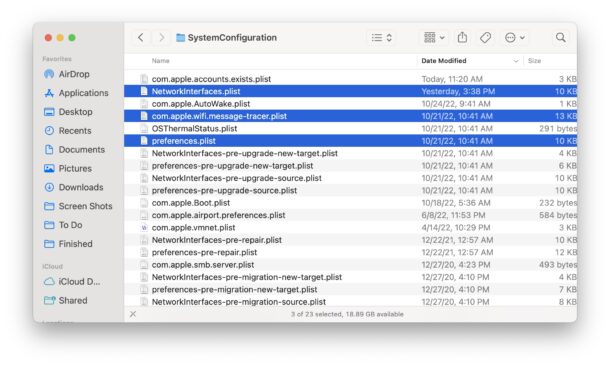
- Open Finder in macOS, then go to “Go” menu and choose “Go To Folder”
- Enter the following file system path:
- Hit return to jump to that location, now locate and select the following files in that SystemConfiguration folder
- Drag those files to the desktop (to serve as a backup)
- Restart the Mac by going to the Apple menu and choosing Restart
- After the Mac has restarted, return to the wi-fi menu and toggle Wi-Fi back on
- From the Wi-Fi menu, select the wi-fi network you wish to join, connecting to it as usual
/Library/Preferences/SystemConfiguration/
com.apple.wifi.message-tracer.plist

NetworkInterfaces.plist

com.apple.airport.preferences.plist

com.apple.network.eapolclient.configuration.plist

preferences.plist

At this point wi-fi should be working as expected.
3: Try Booting the Mac into Safe Mode and Using Wi-Fi
If you’ve done the above and still are experiencing wi-fi issues, try starting the Mac into safe mode and using Wi-Fi there. Booting into Safe Mode temporarily disables login items which may help to further troubleshoot the problem with internet connectivity. booting a Mac into safe mode is easy but differs per Apple Silicon or Intel Macs.
- For Intel Macs, reboot the Mac and hold down the SHIFT key until you login to the Mac
- For Apple Silicon Macs (m1, m2, etc), turn the Mac off, let it sit powered off for 10 seconds, then press and hold the POWER button until you see the Options screen. Now press and hold SHIFT key and choose “Continue in Safe Mode” to boot the Mac in Safe Mode
After the Mac starts in Safe Mode you’ll find many customizations and preferences are set aside temporarily while in Safe Mode, but this can allow you to troubleshoot problems on the Mac. Try using Wi-Fi or the internet from Safe Mode, if it works in Safe Mode but not in regular boot mode, there’s a high probability a third party app or configuration is messing with internet functionality (like the aforementioned network filters, login items, etc), and you’ll want to try uninstalling those type of filter apps, including third party anti-virus or firewall applications.
To exit out of Safe Mode, simply restart the Mac as usual.
4: Temporarily Turn Off AirDrop
Some Mac users have noticed that having AirDrop enabled when on a busy network or in nearby proximity to a lot of different Macs and iOS devices can cause Wi-Fi issues.
This is likely a bug that will be resolved in a future MacOS update, so be sure to check for system software updates periodically to resolve that issue.
In the meantime, you can temporarily set AirDrop to be OFF to resolve this issue. You can do this by going to Finder > AirDrop > Allow this Mac to be discovered by: > choose “No One”.
You can still turn AirDrop back on when you need to use it, but remember to turn it off again when finished to prevent this specific Wi-Fi problem.
If you’re experiencing wi-fi problems when around a lot of other Macs or devices, but the wi-fi connection is fine when on its own at a home network or similar situation, this may be the problem and a temporary solution. If you disable AirDrop and everything is immediately working, then you’ll know you’re impacted by this particular problem.
–
Did you get your wi-fi working and internet connectivity back in macOS Ventura? Which trick worked for you? Did you find another troubleshooting solution? Let us know your experiences in the comments.


Option 1 worked for me! Big ole thank you to you.
None of these tips helped and I don’t know what to do next. Wifi speeds are consistently high at 650-800mbps on my phone and inconsistent and much slower on my MacBook Air. Shutting off AirDrop seems to have helped a little bit. Any further suggestions?
Previously, I used option #2 because of connectivity issues. Worked fine for some weeks. However, the issue reappeared.
When I attempted to remove the indicated files to the desktop I discovered one of them is missing. It is the com.apple.network.eapolclinet.configuration.plist one.
Any suggestion as I have no backup of this? Thanks.
Step 2 worked also for me on Mac mini M2 Pro.
Thank you very much !! ;)
Glad to hear it helped you Lippoli!
None of these worked for me but the Genius Bar fixed my problem! My old machine ran an Intel processor but the new machine uses an M2 processor. When the Migration Assistant ran, it transferred system files that were in conflict with the new one. They wiped it clean and repeated the migration without system files and it worked!
hello you had to reset to factory version to be able to re-install right?
Would it be normal for the com.apple.airport.preferences.plist file to note the following:
LEAKY_AP_BSSID
xx:xx:xx:xx:xx:xx
LEAKY_AP_LEARNED_DATA
xx:xx:xx:xx:xx:xx being the MAC Address for my Router?
Would it be normal for the com.apple.airport.preferences.plist file to note the following:
LEAKY_AP_BSSID
xx:xx:xx:xx:xx:xx
LEAKY_AP_LEARNED_DATA
xx:xx:xx:xx:xx:xx being the MAC Address for my Router?
Hey Kevin, great question. I am not familiar with this. I don’t think it’s abnormal per se, based on it turning up in google searches, but what exactly it indicates I am not certain of.
Some examples here:
https://gist.github.com/inC3ASE/d5ce5f8d12a65f7bd5214083a3bcd3c3
https://discussions.apple.com/thread/252932448
Is this on an older Mac that has updated to Ventura from several prior releases by chance?
Is it normal for the com.apple.airport.preferences.plist file to note the following:
LEAKY_AP_BSSIDxx:xx:xx:xx:xx:xxLEAKY_AP_LEARNED_DATA
xx:xx:xx:xx:xx:xx being te MAC Address for my Router?
Presumably “LEAKY_AP” is the name of a wi-fi network?
Thank you! Saved the day :-)
I had a VPN that I didn’t even know of running. After removing it, problem solved. Thanks thanks 💜
The split files worked after 2 hours of trying everything! Thank you so so much!!
Deleting the plist files worked for me! Tried everything else with Apple support and nothing. Thanks!
Tip 2 worked for me, before which I was losing my mind. Thanks much
Thank you – I removed little snitch (for now) and that fixed the ability to get wifi back :-)
Step 2 worked for me. Thanks very much.
I am using a MacBook Pro 16 (2019) Intel. First week in January I updated to Ventura 13.1, since then I’m having problems with LAN connections as well as with WLAN.
– checked the filters and proxies – nothing installed on my MacBook.
– trashed all WiFi preferences, rebooted – no change
– booted into Safe Mode, connections worked well. Booted again in regular mode, all problems back again.
– turned of AirDrop – no change
Any more ideas what to do?
Did you ever end up fixing wifi? I have the exact same issue as you. Everything works in safe-mode but not in regular mode.
This article saved me!! Step 2 did it for me!
Thank you! Removing preferences as per step 2 worked for me, M1 13” Pro. I had so many problems in Bali for weeks, finally a fix, thx again
I am using macbook pro 16 ( 2019) intel processor. the machine worked well until ventura was installed and wifi, bluetooth, camera and the sensors of the cooling fans are not working after the update. Need help to restore the machine
Step 2 worked for me on Intel Mac mini.
Thank you
Disabled the content filter .
All back to normal
Thanks Very Much
Ugh, I can’t connect to the internet with Ethernet and Wi-Fi both enabled under Ventura 13.0.1. Wi-Fi works when Ethernet cable isn’t plugged in. Ethernet doesn’t work when Wi-Fi is turned off in System Settings > Network.
When I find issues like this one with basic functionality, I wonder if I’m really on a Mac or just a high-priced Linux/BSD machine with all the problems appertaining. :)
I went through this yesterday (before the article was published). I could access the Internet and a LAN attached printer, but all other access on my LAN were blocked. Ultimately, the problem was a VPN, but it was hard to figure out. Disabling everything in “Login Items” didn’t help, and there was nothing listed in “Network/Proxies”. I found the location of the VPN from the list of “xxx has ben set to run on Login” messages that popped up on reboot. Clicking the “i” icon led me to the folder where the VPN lived, and I had to drag the app icon to trash AND delete it from /Library/ApplicationSupport as well as ~/Library/ApplicationSupport before I could get normal network access. I have yet to try to reinstall the VPN.
Walt
In my case I had to disable VPN. After doing so all returned to normal.