The 4 Most Important Steps Before Selling or Transferring Ownership of a Mac
If you plan on selling a Mac or transferring it to a new owner, you will want to take a few very important steps beforehand rather than just handing the machine off as is. We will walk through exactly what you should do before ever changing ownership of a Mac, including backing up all of your files and data, deauthorizing the computer through iTunes, securely erasing all data so that no future owner can access your old stuff, and finally, reinstalling OS X as clean so that the Mac boots into the initial setup menus as if it was brand new.

Let’s get started!
1: Back Up Everything with Time Machine
![]() The first thing you will want to do is back up anything important that is on the Mac. Since many apps are available for downloading again through the App Store, this primarily means focusing on the important files and documents stored on the machine.
The first thing you will want to do is back up anything important that is on the Mac. Since many apps are available for downloading again through the App Store, this primarily means focusing on the important files and documents stored on the machine.
As usual, the easiest way to back up a Mac completely is through Time Machine. Take a moment to initiate a final manual backup to preserve everything on the Mac:
- Connect the Time Machine drive to the Mac, then pull down the Time Machine menu icon and choose “Back Up Now”
This will backup everything on the Mac: apps, files, data, pictures, media, customizations, literally everything. Additionally, Time Machine allows you to easily migrate everything over to a new machine with Migration Assistant. You can also gain access to critical files that were once on the Mac should they be needed again in the future, even if you have already moved onto another computer.
If you don’t plan on using Time Machine, at the very least take the time to manually back up any critical files yourself. This can be a better solution if you’re only looking to preserve a folder or two in your home directory, say Documents and Photos, and you can just copy them to a connected external hard drive or USB key. If you have any doubts about preserving certain files, it’s always better to play it safe and just back up everything with Time Machine instead.
2: Deauthorize the Computer with iTunes
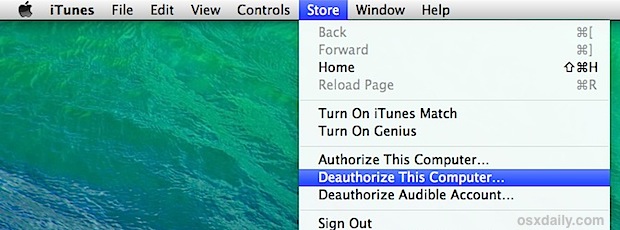
iTunes authorizes individual computers to have access to DRM (protected) content, and typically DRM protected material, like movies and music, can only be used on up to five Macs. Thus, if you’re giving up ownership of a Mac, you will want to deauthorize that Mac first so that it will no longer take up an authorized slot. This is super easy to do:
- Launch iTunes, then pull down the “Store” menu and choose “Deauthorize This Computer”

Don’t worry, if you decide to change your mind and maintain ownership of the Mac, you can always reauthorize the computer again through the same menu.
3: Wipe All Data by Securely Formatting the Hard Drive
Now that you’ve backed up everything and deauthorized the computer through iTunes, you will want to securely erase the entire hard drive so that none of your personal data could ever be recovered by the new owner(s). This is done by rebooting the Mac from Recovery Mode and targeting the primary partition with a secure format:
- Reboot the Mac and hold down the Option key, then select the Recovery partition from the boot menu
- Select “Disk Utility” from the OS X Utilities menu
- Select the hard drive primary partition (typically Macintosh HD) and choose the “Erase” tab
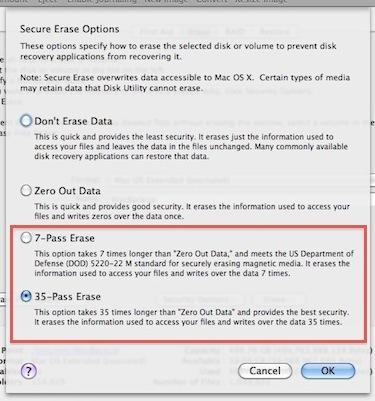
- Click the “Security Options” button and choose “7-Pass Erase” (very secure) or “35-Pass Erase” (extremely secure but much slower), then click “OK”
- Click “Erase” to format the drive

This may take a while depending on which security method you chose. 35-pass takes the longest because it is overwriting any data on the disk 35 times, if you choose that method expect to wait a while, particularly with larger hard drives.
Note for Macs with SSD / Flash Storage: Simply erasing the drive is sufficient for Mac users with SSD drives, and the security options are intentionally greyed out in Disk Utility (though there is a workaround if you’re committed to privacy). This is because data recovery is very difficult on an SSD to begin with, due to how flash storage works alongside TRIM to store, overwrite, and clear blocks on the drive.
When finished, exit out of Disk Utility to return to the OS X Utilities menu to proceed with the last step.
4: Reinstall OS X
You’re almost done! The final step is to simply reinstall OS X so that the new owner receives the Mac as if it was brand new, complete with the initial setup screens and all. Unless you are using a boot installer USB drive, this process requires internet access so that the installer can be retrieved from Apple’s servers:
- Still in Recovery Mode, choose “Reinstall OS X” from the OS X Utilities menu screen (reboot holding down Option key if you are no longer in Recovery)
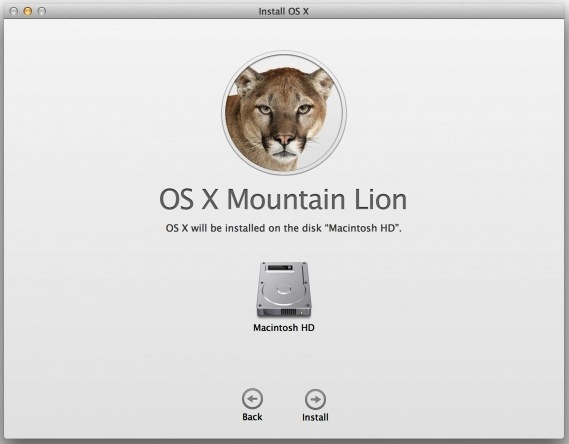
- Click “Continue” and then select the newly formatted “Macintosh HD” partition, then click “Install”

OS X will reinstall fresh, and the Mac will be left with a new clean install. When finished, booting the Mac will appear as if it was brand new when you first received it, with the initial setup screen and all.
Unless you’re giving the Mac to a family member, you most likely will not want to run through the new setup yourself, and instead just leave it as is so that the new owner can go through the configuration process themselves.


If you have set a firmware password, don’t forget to remove the firmware password while you are in the recovery mode, or the new owner won’t be able to access it in osx utilities menu, click Utilities -> Firmware Password Utility
Thank you for the tips above about preparing ones computer for selling. I have done as stated above… all is well. Do I need to do anything with Apple or Applecare to deregister myself if there is time left on Applecare or to free up the access for the new owner?
thanks!