How to Add Songs from Windows PC to iCloud Music Library
Mar 19, 2022 - Leave a Comment

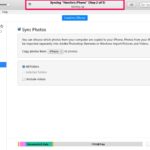
Do you want to add some songs that are locally stored on your Windows PC to your desktop iCloud Music Library? This could be music that you downloaded from the internet or just any other song you have that’s not available on Apple Music. You can get this done using iTunes.