How to Clean Install OS X Yosemite
Most Mac users who are upgrading to OS X Yosemite should go through the standard process via the Mac App Store and start the installation from there, it’s by far the easiest approach and it generally goes flawlessly. Some users like to perform what is known as a clean installation of Mac OS X though, which is essentially wiping the Mac drive, and starting fresh with a brand new untouched install of OS X Yosemite, and then manually copying or accessing files and re-installing apps. While clean installing is not particularly difficult, it’s considered more advanced because it’s a much more hands-on and lengthy process than simply updating to OS X 10.10 through the App Store.
For those who are interested in performing a clean install on their Mac, which basically makes OS X Yosemite appear as if it was brand new, without any settings, preferences, apps, or anything else carried over from before, we’ll cover the process thoroughly in this walkthrough.
The requirements for fresh installs are fairly straightforward:
- A Mac which can run OS X Yosemite – in terms of system requirements, the machines which support Yosemite are the same as that which can run Mavericks
- An OS X Yosemite bootable installer drive – usually this is a USB disk but it can be whatever so long as the drive is bootable, the installer by itself is insufficient unless you’re fresh installing onto a different partition or volume. If you haven’t made one of these yet, do that first
Important: A clean install of OS X Yosemite requires formatting the Mac hard drive, meaning all contents on the disk will be removed and erased. Be sure you have your important files backed up before attempting this.
How to Perform a Fresh Installation of OS X Yosemite on a Mac
- Back up the Mac with Time Machine or by manually copying your most important data to an external drive – never skip backing up your important data
- Attach the OS X Yosemite bootable installer drive to the Mac, then reboot as normal
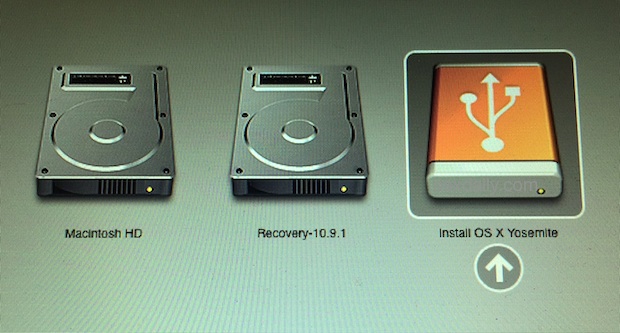
- During boot down the OPTION key until a boot selection menu appears, choose “Install OS X Yosemite” as the drive to boot (this is the USB installer)
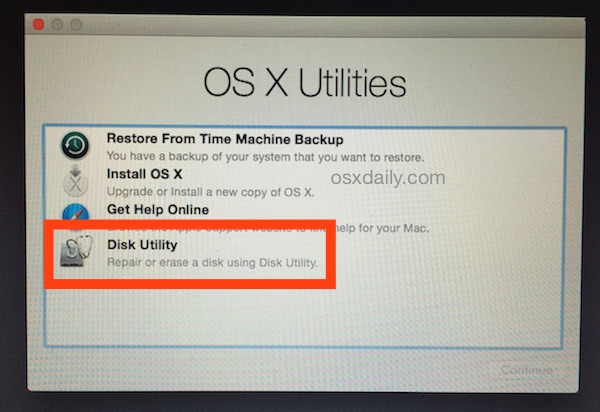
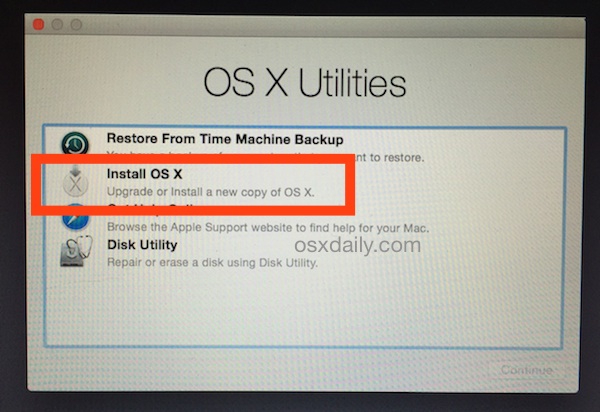
- When the “OS X Utilities” screen appears, choose “Disk Utility”
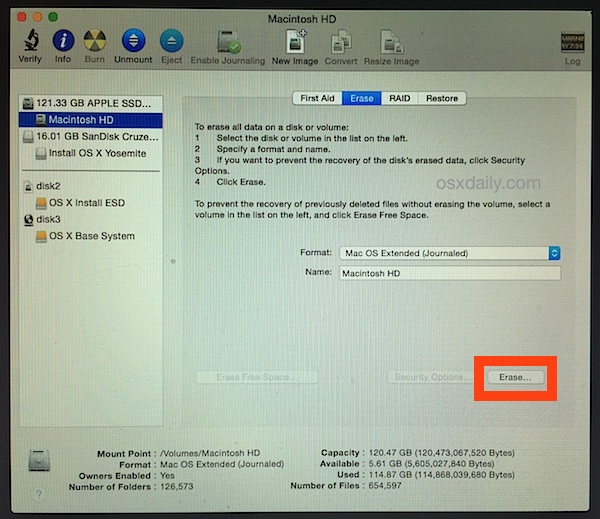
- Choose the hard drive (or partition) from the left side menu which is the destination for the clean Yosemite install, then choose the “Erase” tab
- Choose the Format type as “Mac OS Extended (Journaled)”, name the drive something obvious (like Macintosh HD or Yosemite HD), and then choose “Erase” – this will format the drive / partition and all contents on it
- When the drive has finished formatting, quit Disk Utility to return to the OS X Utilities menu
- Now from the “OS X Utilities” menu, select “Install OS X”
- Click through the Terms of Service and basics, and select the freshly formatted “Macintosh HD” or “Yosemite HD” drive to set as the destination for the fresh install of OS X
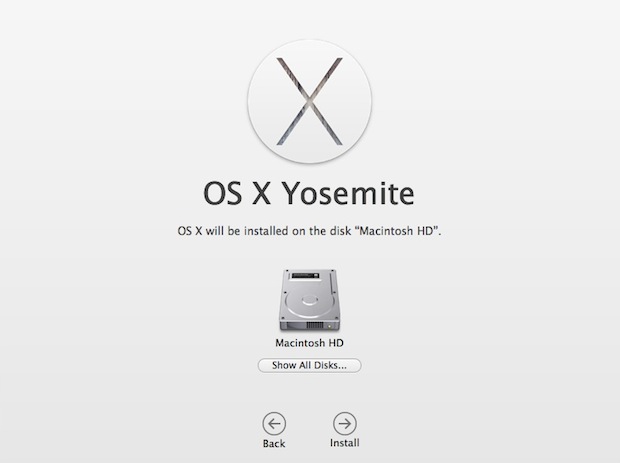
OS X Yosemite will install a completely clean slate version of itself on the blank destination drive, giving the user a fresh start. Because the drive was formatted first, no existing operating system will be updated, and no other contents on the drive will be brought over.
As covered in a separate article, installing the newest version of OS X can take quite a while, though clean installs are generally faster than upgrades. Nonetheless, the Yosemite installation may appear stuck, but it’s probably not, and waiting it out is usually the right choice.
When installation has complete, the Mac will reboot into OS X Yosemite and go through the normal new setup process.
Remember, no data will be on the volume aside from the fresh Yosemite installation, so it’s up to the user to re-install necessary apps, adjust preferences, and most importantly, recover or transfer over again their important documents and files.

Can one follow the same procedure to in install mac os x on e desktop dell optilex 755? Tgnx
Pls help I have upgraded to el Capitan. OsX 10.11.4 on my mac before deciding to make a clean install. After making a bootable Usb if osx 10.11.3 the Usb bootable refused to boot. I have been at it for weeks now but still not working. What do I need to do pls help.
Thanks this helped!
I have installed win8.1 on my macbook pro. I have no recovery disks. How can i reinstall it. Internet recovery too slow
The process as described in the article is flawless. I have used it just today to format a newly purchased 16GB USB drive and make it bootable for OS X El Capitan. A few minor changes to the syntax of the “sudo” command made it work for El Capitan. It only took me 4 tries on variations of the syntax for “El Capitan” in the command before it worked. The resulting bootable USB key named Install OS X El Capitan works as advertised!! I haven’t had a clean install in over 3 years and decided it was time. All my libraries are on external drives, so nothing on internal drive but operating system. So far, so good.
I made the bootable usb drive. It worked flawlessly. It took a long time but eventually after I waited about 45 minutes the message came up, “Copy complete. Done”
how can I upgrade from mountain Lion OS X Version 10.8.5 to Yosemite OS X 10.10.5 on mac book pro A1425 2013 edition class B specification?
I actually don’t want to loose my files.
Help please…
I was doing a clean install of os x ,after formating the drive i couldnt download the os x because of internet connection issue so i stopped and turned off my mac.
When i tried the following day i turned on my mac thinking that it will automatically pickup my external monitor (since ive been using it because of broken lcd) xbut it wouldnt.
Now im stuck with wiped out hard drive and my mac wont pick up exte4nal monitor so i can continue the installation..
Please help me..
Retina macbook pro 15″ early 2013
Help! I’m attempting a clean install on my Macbook Air (2010). I have erased the hard disc, and created a Yosemite startup disc on a flash drive. But when I try to reboot, with Option ket held down, I don’t get to see the flash drive – or anything – except the wifi connection and the spinning globe telling me it’s trying to help over the Internet, and it may take a while.
I imagine I must be doing something wrong, but can anyone suggest what?
Thanks
I have a problem when installing Yosemite through the App Store. Every time I do install Yosemite, and I open it, it gives me the same error. Something about a damaged copy of Yosemite that I installed, and that I have to delete and reinstall. I’ve done this several times, but it gives me the same error every time I do open it up. I’ve been looking forward to Yosemite, despite everyone’s criticism, but the error is frustrating…
My computer froze at step 4, it won’t let me choose any options. What can I do?
I need urgent help.
THanks,
Lorena
I have removed the OS X from my IMac and I installed windows 8.1 instead. My questions, is that possible reinstall the OS X again without remove the windows system?how?. I mean to install the Macintosh as the second system. hope that clear, thanks for your help in advance.
Salam
I created a Yosemite USB install drive with an 8GB USB. However, when I came to do a clean install I was prompted to enter my apple ID. The dialog then took me to a screen where I watched Yosemite being downloaded and installed from the internet (which took a long time on my slow internet connection). Surely this shouldn’t have happened? I thought one of the ideas for installing from USB was to avoid the need for an internet connection?
Any analysis on this would be appreciated! Is this the way Yosemite works, or did I likely do something wrong?
Hi, I just received the error message below. What do you think went wrong?
Thanks for the help.
Couldn’t mount dmg /Volumes/Install OS X Yosemite/Install OS X Yosemite.app/Contents/SharedSupport/InstallESD.dmg (error code 5)Mount of outer dmg failed.
i just upgraded to 10.10.3 but in my purchases tab i still saw the yosemite update and it said download next to it so i clicked it and before i could pause it it had downloaded about 400mb again.. is this an update? it says its the same size as the upgrade was.. is there a way for me to delete the extra 400mb if its not needed as well?
Can someone please help me: After completing step 8 successfully, when I click “Install OS X”, I get a message saying the computer has to restart. This is happening over and over. Any help would be appreciated.
I upgraded to Yosemite on my Mac at the end of April. I’d hesitated for months because of the bad experiences people were having, but a website I need to use now only works properly with Yosemite so I went for it. I wish I hadn’t!
At first it seemed fine . . . but then it started to run slower and slower with the lovely wheel spinning for longer and longer. This wasn’t something I’d really experienced before. It got to a point where clicking on ANYTHING was resulting in a 5-10 minute wait watching the wheel. I felt like throwing the Mac out of the window! Next thing to go was my ability to open safari followed by my ability to do anything at all on my log in / account. I’ve booted in safe mode and still can’t access my account as it doesn’t get passed the ‘thinking about it’ stage.
Logging in as a guest worked at first (though still very slow) but now that has the same never ending wheel spinning going on. I don’t know what to do. I can’t get in to create any backups or reinstalls. Can anyone help me with some advice?
Thanks,
Emma
Hi Emma,
I had the same experience as you, and I solved it by upgrading the RAM in my Mac. My mid-2009 MacBook Pro had 4GB in it, and I went to Crucial UK and ordered 8GB instead. Cost me about £65 but was well worth it as my Mac is now back to it’s usual sparkling performance levels! Hope that helps.
Rob
Worked a treat after reading the instructions above. Thanks to all.
Thanks so much, this worked really well.
However to start with I had the familiar error code 112 problem (it actually said it was error code 110). Anyway, I simply used a different external hard drive and it worked perfectly.
Thanks again for your help.
i just start reinstall macbook pro os x yosemite,whay have to take so long time to installing ?more than 30 hours !how to solve it
thank you
Hi,
I upgraded from Lion to Yosemite.
I don’t know why but I can’t start the Photos. Tried to press the “Option” button (long press) as opening the photos and then choosing the I-Photo library.
It crashed after 50% loading (more or less).
Can I reinstall the Yosemite or should I try something else?
Thank you for your help’
Arnon
Photos app crashes for a lot of users when trying to import libraries from iPhoto and Aperture, particularly once it hits movies. The best thing to do is to just use iPhoto for the time being until Apple patches Photos app some day. At the rate they patch OS X Yosemite, it should be some time next twenty years. Or don’t import movies, that can help too.
Meant reboot
Can somebody please help I tried to reinstall the os but everytime it finishes it never reboots it goes back to disk utility I tried 10 times still the same thing I also waited for the report about an hour or two but it still doesn’t reboot
Honestly, this is all ridiculous. You should NOT need to have to reinstall an OS unless it has been corrupted. Apple should investigate why degradation happens over time and with OS upgrades and fix the bugs and make the OS more robust.
I could not believe how complex this process is! We’re told to back up to Time Machine every hour of every day – oh, but don’t use that back up to restore your files – manually copy them, copy them all back, and hope that all the settings and passwords and iTunes authorizations all get put back properly.
You’d think after so many OS iterations Apple would make it easy to reinstall an OS.
My mid-2009 iMac has slowed to a crawl and I dread having to go thru this process.
I did it a different way…I booted up while holding Cmd+R and came into the OSX Recovery Mode. I then clicked on Disc Manager and wiped my drive clean and then selected install OSX and it proceeded to download OSX Yosemite and install it. It was very easy and I encountered no problems.
I just tried the same thing, but it’s now downloading Lion instead of Yosemite. How did you get it to offer you Yosemite?
(This is my second attempt. After the first attempt, I did upgrade to Yosemite, but I wanted to reload again so I had a clean Yosemite-only install.)
Tnx. I tried to install Yosemite on my MBP2011 3 times, after almost two days I gave up and did a clean install following these instructions. Afterward migrated my data and applications from the TM. Tnx.
The above instructions really helped a lot to solve my issue in installing the Yosemite.
Thanks
I have a mac pro 2.93ghz (Nehalem) and am trying to install Yosemite to no avail. The install process will go to a point where a circle with a diagonally bar shows up and everything stops. I even have downloaded another install but always the same ending. Circle with bar and everything stops. I’ve tried a different hd no difference. I have an identical computer which installed the new OS without a glitch. Any ideas out there?
I ran into this error during the Install Process from my Bootable Installer Drive:
“This copy of the Install OS X Yosemite application can’t be verified. It may have been corrupted or tampered with during downloading.”
Apparently the problem was that my system date got reset (because I also had just installed a new hard drive).
The problem had nothing to do with the installer app. The solution is detailed here:
https://osxdaily.com/2015/01/19/fix-os-x-install-errors-cant-be-verified-error-occurred-preparing-mac/
I tried doing this all, however, as soon as I choose “Install OS X Yosemite” as the drive to boot (I correctly installed it on a USB-Stick) it wont open. I have been waiting for 5 hours, and nothing happened, tried it again, still the same. I only see the Apple logo and the loading bar, which seems to come to a stop half way. Any ideas? I really like to do this. Please help
I’ve upgraded OSX several times without any issues. Yosemite was the first time something seemed to be amiss. Ever since installing Yosemite my computer has been crashing a few times a day. I couldn’t quite figure out if it’s a particular application x OSX combo that’s causing it or what not… spent a few weeks not using various apps trying to isolate the issue but no pattern. Read on the web that a clean install might be a possible solution so here I am.
Just wanted to share that for some people, this might be a good reason to try a clean install. And for those fearing upgrading – it’s usually not a bug issue, but more of a will your computer’s hardware keep up with the new system demands / performance consideration. If an old OSX works for most general purposes there isn’t a need to upgrade immediately and you can always wait and decide later if upgrading is right for you. One thing that I think is nice to remind oneself is that OSX upgrades are free. So at least you’re not going to end up wasting any money if upgrading causes issues. (Well, time is money I suppose.)
Good topic and I did it like pro.
Thanks
I’d like to use the installer to install Yosemite on a replacement drive. Can I do that with the new drive installed into my MBP, or do I need to install Yosemite to the new drive while it’s mounted in an external carrier, and then swap the new drive in? Do I need to format the new drive before I use the installer as well?
STEP 9: when you click install OS and get an error message saying that “the file may have been corrupted or tampered during download”, your file is not corrupted or tampered. It’s just that Apple can not verify the integrity of your O.S. installer due to your computer NOT connected to the internet. Make sure your computer is hard wired to the internet, not using WIFI, and try again, the error will disappear and you can proceed with the installation.
Came across this error, having a hired wired connection didn’t hekp. I suppose I have to try recreating the installer drive?
I’ve gone through the entire process twice, and I am still receiving the error “this copy of the install on x Yosemite application can’t be verified. It may have been corrupted or tampered with during downloading.” I’ve even made sure I have the correct time in terminal as suggested by other websites. Any ideas?
Connect the Mac to the internet, it verifies the installer over the internet and it will remove the ‘can’t be verified’ message in that process.
Also, OS X Yosemite is really buggy, I would not install it at all on any Mac that is not a test environment.
This wiped the error. Thanks a lot.
Hello. Having a nightmare. I own a 2011 iMac which had a few issues, and I had to erase the hard drive. On booting, I get the recovery page where I can download OS X mavericks, which fails to download after the “verifying your machine” message. Went to macworld.com and followed their instructions for creating a bootable USB for Yosemite and it wouldn’t boot, redid it 3 times and it still wouldn’t boot. Finally got to osxdaily.com’s guide, first time it wouldn’t boot. The second time, it finally did boot, however, as soon as it starts the installation, I get a message saying something along the lines of “install file corrupt”.
Please help.
Install Yosemite via App Store (dirty install)
ReBoot Mac with command + r pressed
Open disk utility and erase mackintosh HD
Close disk utility puts you back at recovery
Make sure you are connected to your WiFi
Choose reinstall OSX
Log in with Apple ID and password
It will download fresh copy of Yosemite and install it (clean install)
Wait on fast connection download can take 30 minutes, could easily be longer on slow connection.
Takes around 30 minutes to then install (2007 MBP core 2 Duo)
Regards.
Please help me…I did all of this and it worked beautifully but the moment I unmount the drive — there is nothing. It is like the operating system installed and is on the portable drive. Can this be possible? Please help!
I have a problem.
After the boot, i can only see “macintosh hd” and “recovery”, but not “install os x”.
How can i solve this?
Thanks guys!
I am also looking for the ‘archive and install’ option which appears to be no longer in the Yosemite installer: The only option is to install over the top as far as I can see…?
When you’re talking about erasing the hard drive, that is NOT what used to be referred to as a “clean install” (in OS 9) and an “archive and install” (in OS 10) Although, I will admit that erasing the hard drive is the “cleanest” way to go.
What I am looking for is a way to *avoid* erasing my entire hard drive, installing a pristine new Yosemite system folder and disabling my screwed up (THANKS, Dropbox) present system folder. isn’t there a way to do that without erasing the hard drive? I have a bootable USB drive but when I try to install it wants me to be connected to the internet and I can’t be without my settings on the bootable drive.
I have updated my MacBook pro to Yosemite and got a very slow machine after it. I have now seen that I can re-install (clean) and would perhaps have chosen it. Is it too late now? If I can use the clean-meotden, will I then lose my programs from Microsoft office?
I’m trying to do a clean install of Yosemite from a bootable USB drive onto a Mavericks OS on a 2008 iMac with Intel chip. When I boot up holding OPTION key, I’m presented with Mac HD and Recovery choices but NOT the Yosemite choice shown in the illustration. After booting up in Mavericks, Yosemite USB shows on desktop. What am I doing wrong?
Got all the way to the install window, when asked what drive to do the instal click through it only shows the USB drive NOT the hard drive from the macbook pro.
Opened disk utility to see if I could re-formate the CPU HD but its not even recognized there either.
Anything thoughts on where I went wrong? Or is it a trip to the genius bar?
Thanks to the author of this article. Very helpful. I erased the free space too to be sure the disk was completely clean, which took about 12 hours for a 2 TB drive on my 2009 iMac. The rest of the fresh install was easy using the 16GB USB thumb drive as the installer.
I thank the author for these step be step instructions, particularly on how to create a thumb drive that is a Yosemite Installation Disk. This worked precisely as described to do a clean install on a 2 year old Macbook Air running 10.9 and then moving 180GB of applications and files from a 4 year old Macbook Air to the newer one.
Quick question.
I have a 16GB bootable drive with Yosemite ready to go. I backed up all my files with Time Machine on an external HD, and to be safe, copied all my files to a 2nd EHD.
Before performing a clean install of Yosemite, I want to shut down the Macbook, swap out my memory sticks (going from 4GB to 8GB), and put in a new SSD (to replace an old HDD).
With new memory and SSD in place, and the bootable USB connected, I want to boot up the MacBook and perform the clean install. (Then I’ll move my files back and reinstall apps)
Q: Am I missing anything? Are there any potential problems I should be aware of?
-Thanks
Step 3: the mount image for the installer does not appear, just the image for the stick it’s on. That way the installation is not possible. Any idea, how to change this?
I did an upgrade from Mavericks to Yosemite on my iMac and it was smooth.
However after a few days or so, it started slowing down and apps froze every 5 secs especially Chrome and Finder! I did all the tweaks there is. From repair perms/disk, erase free space to PRAM, SMC resets and nothing helped!
The amount of curses I spurted as my productivity went away is just too much. So I decided to do a fresh f* installation. (Because I’m already in Yosemite and the installer was deleted after; don’t have a spare mac.)
I erased the disk and opened up Recovery Mode and chose Reinstall OSX and got through the Apple ID and shi*. I cancelled because it was taking too long to download (16 hours on a 10MBps connection–f*!).
Since I have no choice now, might as well do it through Internet Recovery and see how it goes. (Current download time is 45mins.)
This sh* feels like Windows all over again. I mean f*! I’ll remind myself not to f* upgrade right away each time Apple gives away a f* free OS.
Dear sirs,
After following all the aforementioned steps thoroughly, I created a rebootable external HD with the OS X Yosemite, I totally erased my Macbook pro (mid 2012).
Trying to make a clean install at the end just before the restart of the Mac it says that ther is a problem with the installation. I tried it many times with the same result. Now my Mac is totally clean and I’m writing from my I phone. Please help!
Reboot and hold Command+R and do a system restore
Or install OS X from a USB drive
What happens to my old Mavericks time machine backups? Meaning I backed up with Mavericks, then did a clean install. Now, do I just plug in my external drive with the Mavericks back up on it and tell Yosemite to back up? If so, what happens to the old Mavericks backups? Do they get erased? is a new folder/file created for the Yosemite backups and the old Mavericks is left alone?
Hi
I get this error in the Installer logs
Failed to verify InstallESD.dmg: hdiutil verify failed
Retrying pisa://…..::/InstallESG.dmg after 1 failure?
What is the cause of this failure?
Thanks,
Rajesh
I am so glad to do a clean install! I did my time machine backup before. In my opinion, keep things safe is a priority, then I followed your procedure without any trouble. Sometime seems to be stuck but that’s OK, I got a cup of coffee and relax, the Divine World off Apple was taking over LOL. Thank you.
I can get everything to work until I reboot it and hold down option. At that point, a Time Machine option comes up, not a USB option. I can still go to Disk Utility and erase everything, but it won’t let me reinstall Yosemite because it says it can’t find the installation information. Did I do something wrong? It tells me to contact AppleCare. Where the step to “Install OS X” should come up, mine says “Reinstall.” I don’t know if that makes a difference?
I always clone my MacBook hard drive to an external and run new upgrades and installs on the external first before I go messing with the internal. I have been burnt to many times by faulty install and incompatible software. Then if I like it and everything works I clone it to the internal drive. But I’m I highly cautious person after I almost lost $50,000.00 worth of music due to a failed cooling fan in an external HD.
Yosemite is a ridiculous operating system
Full of problems
A big stink
My nerves are shredded
The colors and graphics are stupid
F**k Yosemite
An operating system is slow
To pull this s**t !!!
I created a USB drive of Yosemite, and then went through your steps. It seemed to work pretty fast (under a half an hour), and when done, Yosemite ran much faster then installing Yosemite over Mavericks, or a clean install using migration assistant. Unfortunately my hard drive, & time machine, are not to be found on my desktop, or dock. The backup drive is on the desktop, and after entering and setting up time machine through finder, it still backs up. Still my time machine itself doesn’t seem to hold an of the data. I’m not sure what I did wrong, because I followed your instructions to the letter. I must have missed something, so will be trying it again. Any ideas what I might have done wrong?
These are instructions for a clean install which wipes the destination drive clean and starts ‘clean’ meaning its blank. A clean install preserves no user data, that part is up to the user to restore their stuff from their backups. It’s fairly advanced and time consuming, which is why most users are better off updating from the App Store. And always backup your stuff. Restoring stuff from a Time Machine backup is separate, you can do that from the Time Machine app in OS X if you connect your Time Machine drive to the computer. Of course that assumes you made complete backups prior to formatting your drive.
I did a clean instal on my 2008 13′ Aluminum MacBook (500 hd and 4gig ram) and had no issues at all. It now runs just as fast as it did when it was new.
I am loving Yosemite and just wanted to say thank you for these instructions!
It took around 20 minutes to install Yosemite to my mac book pro…
I am new to the Macworld and I love it…I dont think Ill ever go back to windows…My Question is when you do clean installs like this do I have to backup my drivers and bring them over after the install…Thank You Like I said Im brand new
Dear OX Daily and readers
I recently downloaded an app from a reputable source and found a revolting advert for scanning/repair services embedded. It comes up in Safari screen.
I created a boot drive and reinstalled as per the instructions in order to remove the offending object. Everything seemed to go successfully, but I find I still have the advert and all the files that were on the H.D. previously. I have since repeated the whole process with similar result. What am I not doing? Is there an alternative way of removing the ad?
All suggestions gratefully received. I am new to mac but have otherwise found the change worthwhile.
Thank you, it worked!
My question: Can I reinstall this very same way Yosemite itself? Just use these steps with the only difference being that I already have Yosemite?
Thank you in advance
Yes if you already have Yosemite but you want to wipe the hard drive and start with a fresh OS X Yosemite install with nothing on it, this will do that too.
Thank you! So I will just follow the process again. One more question – is the bootable USB still usable like a normal one meaning Windows recognises it or it now like an external hard drive journaled for Mac only?
Thanks and smiles!
Dear OS X Daily,
I have done this successfully – thank you.
My question: Can I reinstall this very same way Yosemite itself? Delete the drive and install it again from the bootable USB?
Thank you in advance
I bought a Macbook pro brand new 2 months ago. Cost was substantialy higher than similar windows machines, but the sales person did a lot of bragging about the smooth and user friendly world of apple.
After this update to yosemite, the computer has been useless – bootime well in excess of 2 hours! Keeps dropping network, can’t reinstall is etc.
During my 2 months as a mac owner, I’ve spent more time on forms like this then I’ve done during the last 20 years with windows… A BIG disappointment. Selling my mac and going back to windows. Might not be so fancy to look at, but it works and it’s much easier on the wallet.
Heck, hate spending time trying to get the machine to work rather than doing my.work on the machine
Yea good call, sell the Mac, ditch OS X Yosemite, and go back to Windows, it’s a real gem and you’ll never have any problems with Windows. If you like Windows, maybe should have stayed on Windows too. Or you know, since you have a Mac that’s only 2 months old, you could CALL APPLE SUPPORT and talk to an official Apple Support Rep since you have a WARRANTY and let them fix your problems, but nah, complaining in an unrelated OS X Yosemite clean installation walkthrough is the place to be! Good call Benjamin, bravo! Windows for Benjamin!
Thanks for this article!
My concern is: The “fresh” install does seem to contain some personal information: I deleted the harddrive completely, and did a reboot from the created USB Yosemite installer drive. I then realized that I was connected to my wireless network, although I did not enter the wireless key at any time after I deleted the disk. Where does the information come from, which personal information is contained in the USB installer medium? Thanks!
I have this problem too, there are files in the trash after a clean install. I must have done something wrong :-(
Like Mavericks, Yosemite can be downloaded free from App Store. I have used beta version of Yosemite. Now, I am thinking to have a fresh install of complete Yosemite in a separate volume. But before proceeding to it, I”ll backup up my data and software to an external drive to get rid from the above mentioned issues.
would this work if i only delete the MacOSx drive and let my bootcamp partition as it is?
a hint would be nice…
please someone help me>>
\
I am very upset why i upgraded to yosemite. now nothing works.. and i have an exam to take in dec and i can’t make this wifi stay connected. all went bad after upgrade. I wish i didn’t. and i wish they stop doin that invite to upgrade sounding that all is better when i just got hosed. i hate this so much I am helpless.
I’m reading a lot of complaining.
It really isn’t that hard. If you can’t figure out these basic instructions maybe computing isn’t for you…
Installed OSX Yosemite upgrade and now my Mac takes so long to connect to the point that pages do not even load This is an upgrade I wished I had never done, my PC is now faster and I am having to post this reply from it as my Mac will not connect.
My HD seem to be “missing” after following step 6. This is unbelievable. There was nothing wrong with my laptop and now it is pretty much a paperweight. Apple is of no help either.
Reboot with COMMAND+R to Recovery Mode or use Disk Utility, the drive is still there. You formatted it, so perhaps you gave it the wrong file system type. But that’s what a CLEAN install does, it erases the drive and starts clean, that’s why it’s called “clean” install.
While this fresh start is strait forward, and my 2011 iMac needs it since I migrated everything over from a 2006 Macbook when I purchased my iMac, I have a couple of questions. I live by my calendar and my contacts. Where to I find these db’s so that they load into the new calendar and contacts list? Will they come from my iCloud account?
I have all the reg keys to my software so I am not too worried in this field, it will just be a tedious job of re-installing these apps and re-entering these keys.
Can anyone add to my questions? Thanks!
Enjoying the back and forth banter and useful information. Thanks. I own a mid 2009 MacBookPro running Mavericks, 2.26 Intel Core 2 Duo and 8 GB 1067 MHz DDR3. I know it’s compatible with Yosemite but will speed become an issue … slowdown?
Kate, I have the same macbook pro you have and when i did my upgrade i also installed a Samsung 500gb SSD that has made my computer now with Yosemite faster than when it was running snow leopard back in day. LOVE IT
Kate, My late 2008 MBP with 2GB HD Yosemite internet upgrade is running slow and buggy and Genius can’t run all their tests on such an old HD so I’m taking it to Tekserve to replace it and bring it into the 2015’s technology. I’ve never had one mac for so long but it’s not worth trying to massage such an old HD anymore.
I am interested in doing a clean install as well. After doing the normal Yosemite update on my iMac mid-2010, it runs painfully slow…
A basic question: I have a Bootcamp partition that I need to keep as it is. Is it possible to do the whole process keeping that partition?
Thks for your advises.
Michel
If I want to do a clean install of Yosemite, can i just copy my apps (like Xcode.app) from the Application folder to an external HDD and transfer them back on Yosemite?
Will they work? Or will i have to re-install them from mac app store?
Interesting that in this article you recommend erasing, I have always repartitioned the hard drive for new fresh installs.
Any suggestions for a “clean” install on an SSD that points to a home folder on a different physical drive? The install part is “easy” – the hard part is keeping it “clean” and keeping the itunes / iphoto / documents folders and files off the SSD and linking them back to the home folder CORRECTLY! Any help would be appreciated!
I did a fresh install of Yosemite last night on my office iMac, because it seemed a little slow. Everything seemed to work correctly and I ended up shutting down the computer for the night. Then, I come in this morning, boot it up and all of my old stuff is back on there again. How did that happen?
You probably installed Yosemite onto a different partition or drive. Reboot and hold down the Option key to see which volumes you have available, likely to find Yosemite and Mavericks there.
Yes I went through the same ‘omg why the fark is it freezing for so long!’ I.e at the 50% mark😤. Eventually after turning it on when come home from work and turning it off when when going to work for 3 days of panic, it finally showed the os x utilities box. From there you just simply follow the instructions. I chose to clean and erase my sh*t and get a clean slate with Yosemite hd (what a f**ked up name, why would you call it this. Sounds like a Vegemite brand) anyway if you wanna keep important stuff on your drive then there are instructions you can follow if you choose to back your sh*t up.
LOL, Yosemite is pronounced like Yoh-sem-uh-tee, not Vegemite. It’s an aboriginal American word for Grizzly Bear, but then the westerners arrived, paved it over, and turned the valley into a sort of woodsy Disney Land type of experience with an entry fee. It’s a very popular park in California, thus why Apple chose the name for OS X. Not familiar to the rest of the world, likely.
Everyone’s heard of Yosemite Sam…
Typing “what a f**ked up name” should automatically open Google search in all OS’s, IMHO, LOL.
I have añ issue where my MacBook Pro freezes after loadin desktop
I called repaired disk and reinstall the os and nothing works would a clean install eliminate this issue please other suggestions
I created a USB installer in terminal and ran the install from the USB drive. I learned from my Mountain Lion install that the USB install was more “Solid.” Assuming you downloaded the update from the App Store and then cancelled the update, launch Terminal and pop this long command in it, changing USB DEVICE NAME with the name of your USB drive.
sudo /Applications/Install\ OS\ X\ Yosemite.app/Contents/Resources/createinstallmedia –volume /Volumes/USB DEVICE NAME –applicationpath /Applications/Install\ OS\ X\ Yosemite.app –nointeraction
For the people posting about not being able to install Yosemite after formatting their drives…you can’t run a clean install from a downloaded copy of Yosemite. The issue here is that the install files are saved on the partition you are formatting, which is why only recovery is available after you format.
One of the first posts here talks about Internet Recovery, which is an option, but if you really want to clean install, I highly recommend making a USB install drive and booting from it. You can then format and install away.
I followed the instructions very carefully; and I was able to make a bootable version of Yosemite on a USB stick with very few hickups. The only things I found weird occurred during the creation of the USB drive. The instructions talk about selecting the type of partition to give the USB drive (after the partition is done). But, I could not find an option to choose the type of partition (that had just been created) on the USB drive (while in disk utilities). But fortunately, my USB had already defaulted to the GUID type of partition that was stated in the instructions. As for renaming the USB drive from Untitled1 to Untitled (after making the partition on the USB drive), I did have to go through finder to rename it because I could not rename Untitled1 to Untitled in disk utilities after creating a partition on the USB drive. Perhaps the instructions could have been a bit clearer on these two issues that I have described while creating the USB bootable media. Otherwise, it worked out fine; and I worked around these issues.
Overall, the article is quite good at explaining the process. And except for the couple of hickups I had while creating the USB bootable drive, the instructions are very straight forward.
I intend to keep a USB bootable drive for Yosemite. As mentioned on this forum (previously by another poster), yes, you can go through internet recovery (as an option to clean install), but I think a USB bootable drive is the way to go! Also, this physical media is something you can keep for the lifetime that you have Yosemite on your Mac. Of course, we know there will always be updates to OS X, just like all the previous ones. But it’s not that difficult to remake a new USB drive at a later time (if you wish)….or continue to keep the original bootable drive you make and simply update the system after any clean install that may be done at a later time. I am old school and feel physical media (as a backup) is better than relying on the apple store.
For anyone who struggles with this process, they may want to print out the article. Sometimes I find printed instructions can be helpful, especially if you are trying to navigate multiple computer screens.
I had to erase my HD, copy an old Snow Leopard system to it, then run Migration Assistant. MA took about 20 hours.
Worst upgrade ever.
Lot of guys complaining about the loading bar…
https://discussions.apple.com/thread/6605379
https://discussions.apple.com/thread/6605492?start=60&tstart=0
Mike I had the same problem with my MacBook Pro . I erased my “Macintosh HD” and the only option was to reinstall Mavericks. So I did try to reinstall Mavericks but an error showed up “try again later”. I couldn’t figure it out so I took it to the apple Genius and they reinstalled it for me. Their reasoning was sometimes the hard drive crashes and make these internal errors so they had to reboot it. Take note that it is free of charge and you just have to make an appointment!
I didn’t like Mavericks, so I put Yosemite on the iMac at work right away. Big Mistake! Now Office Outlook e-mail doesn’t work. Yahoo e-mail doesn’t work… In Safari or Firefox… I hate the new look, too. I can’t wait to go in in the morning and try to sort the mess out! I’m gonna have to bring my home laptop in just to get my work done! Thanks for nothing, Apple.
why don’t you get a windows pc
yeah, try windows 8
have a ball
Better yet, go with Linux, sooooo much better and hardly ever any problems like with the apple upgrades though I have not had any problems with Apple that I couldnt fix.
Very much reluctant to go to Yosemite after the disaster that, on my laptop anyway, was Mavericks (I had to revert back to Mountain Lion within a week). The Mail app alone bolloxed so much stuff, that I never went near it again.
During the installation of Yosemite a most amazing thing happened, it had downloaded from the App store and was now installing, I think it was on the second stage when suddenly there was a poof!! and I mean that and wDhat appeared to be a small cloud of smoke came out of the back of my 2014 27in iMac.
The installation continued while I sat openmouthed for a few seconds, I checked the back of the iMac and sure enough my desk was covered in tiny particles of what I can only describe as dust.
The installation was otherwise unremarkable aside from some initial internet connection issues which have since resolved themselves and I am very happy with the overall feel of the new OS I do recommend changing highlight from blue to charcoal it is much better to look at.
I don’t know how to explain what happened but maybe this really was a “clean” install.
Holy Sh*t!!! Same thing just happened to me, I thought I was losing it for a min
And me. Taking my machine into the shop Monday for a diagnostic check.
Guys, explanation is easy: when installing the new OS the temps inside your mac reach higher values. As a result the fan kicks in, maybe at max speed. If there’s excessive dust, it will be removed loudly.
Thanx.
I have Windows 8.1 and Yosemite on the same hard drive. By clean install of Yosemite, do I have to redo Windows 8.1?
if you don’t format the Windows 8.1 drive it will maintain itself
I erased the disk on a MBP ’12 running Mountain Lion before upgrading to Yosemite. So I erased the “Macintosh HD” using Disk Utility and now I’m at the “OS X Utilities” front-window in recovery mode.
The problem is that there is no “Install OS X” menu option but rather a “Reinstall OS X” option which takes me to the process of reinstalling Mountain Lion. That would be fine if I could reinstall Mountain Lion then upgrade to Yosemite from the App Store, but there’s some dumb error when trying to reinstall Mountain Lion.
Any ideas?
Mike I had the same problem with my MacBook Pro . I erased my “Macintosh HD” and the only option was to reinstall Mavericks. So I did try to reinstall Mavericks but an error showed up “try again later”. I couldn’t figure it out so I took it to the apple Genius and they reinstalled it for me. Their reasoning was sometimes the hard drive crashes and make these internal errors so they had to reboot it. Take note that it is free of charge and you just have to make an appointment!
Why not make a second partition and install to that. You have Yosemite to test run and your old install as a backup. Best of both worlds.
do I need to de-authorize iTunes and then later reauthorize iTunes for that Mac? I get conflicting information when I search for this answer. Thanks!
Not if you’re running Mac OS X on a physical Apple machine because iTunes will identify this machine in the same fashion when you re-install. If you are running Mac OS X on a virtual machine and/or Hackintosh you should de-authorize.*
* not an endorsement of Hacktonishes in any way, shape, or form.
Ultimately, this is what I had to do because I could not upgrade to Yosemite on top of Mavericks. I’m really disappointed in Apple with this new OS. Apple could have done a better job with this OS than to make users, especially me being a new general user, manually move files over to the new OS. I’m strongly considering not upgrading to the iPhone 6 Plus after this BS. Great job Apple!
Why couldn’t you upgrade your Mavericks install? Were you on 10.9.5? Are you on a Hackintosh? Something must be wrong, as an upgrade is always possible.
Maybe he can upgrade but would rather have a WiFi connection
Could you give us more details about what happened? I have supported many people over the years to undertake a range of OSX upgrades and have never had such a failure. Your story might help others to avoid any pitfalls there might be, and I’m sure Apple would be interested to hear how your install went so that they can improve everyone’s experience in future.
Mishendr I am a basic user of a Mac (Web surfing, Music downloads, etc) so no hacking going on here. I avoided trying to download the update as soon as it came out. Then, I simply downloaded and installed it from the App Store. The installation was working perfectly so I assumed everything was fine. Once it rebooted, that’s when everything went to hell. I had to “wait it out” as a previous post said. Then I decided to hard reboot and out of nowhere I came to the log in screen. Therefore I assumed it was some type of glitch. Wrong! When I clicked on my name to log in, I kept getting the beachball. On average, the prompt to enter my password took 5 mins. Once I finally pressed Enter, my desktop came up, but it shouldn’t take 5 mins for the password prompt to come up. Once at my desktop, I couldn’t open the Finder window, but I could open Safari, iTunes, etc. Everytime I would Force Quit Finder and try to open it again, it would not responding. Finally, I power cycled a few times before I said to hell with it and performed a clean install.
My attempts were stopped by the following entry:
Container dmg is missing universal diagnostics. this install will continue attempting to preserve existing diagnostic software.
All lines after this, from line 31 thru line 313, in the install log, had the teru ReportCrash with a three digit number.
I as able to cmd q and get back to 10.9.5.
Since I couldn’t find a solution, I have quit for now, frustrated and unhappy.
No problems with a Macbook pro which is older than the failed iMac.
Bob
Craig, Yosemite is a specifically compatible upgrade from Mavericks. It couldn’t get any easier. You clearly don’t know what you’re doing.
Funny how people still say Macs are for people who don’t know how to use computers.
TechUser, if you read the post you’re replying to, you’d see that Craig Holt seems to know what has happened to him and if you’re really a tech user, you’d know that things don’t always work like they’re supposed to.
I’ve had my shared of app store updates that didn’t work, 10.9 to 10.9.2 repeatedly “downloaded” repeatedly “installed” only to reboot with 10.9 and being told to update.
Tech is never perfect.
I’m not computer expert because I know what a computer expert really means, but by the general public I’m considered one. I worked in the software development industry for 8 years, installed and update countless Win, OSX OS’s and Linux since 93.
So TechUser, perhaps you’re the one who has no idea what you’re talking about.
Funny how everyone clearly knows everything on the internet.
There’s a way easier way to accomplish this. All I had to do was make sure Yosemite was in my purchase history on the App Store. After I clicked “buy/download” I cancelled the download and proceeded to reboot to “internet recovery mode” (alt + cmd + r) upon boot. After launching Internet recovery I launched disk utility in order to format my drive and then proceeded to install Yosemite which Internet recovery detected in my purchase history after I provided my Apple ID/password. Then I waited the appropriate time for Yosemite to download and install (for me about 30 min) and presto! A fresh install of OS X Yosemite. Of course this isn’t as easy on an older Mac. ’08 or ’09 I believe is the cutoff date for the “internet recovery” ability.
That’s a great trick for those who don’t want to make a USB installer disk and don’t mind re-downloading the Yosemite installer again. Thanks Robert!
Just tried this with a brand new MacBook Air that came with Mavericks installed. I setup the machine, launched the App Store, started downloading Yosemite, cancelled the download, and confirmed that Yosemite was in my purchases list. Rebooted into Recovery, reformatted my startup disk and rebooted once again into Internet Recovery. I am now waiting 3 hours for Mavericks to reinstall itself on my machine. FAIL!
KayB,
So I haven’t done my upgrade to Yosemite yet and I am on an early 2007 MacBook Pro with Mavericks so i have to do a fresh install. What i had noticed about your paragraph was that I read was a boot into Recovery and not into Internet Recovery Mode using Alt-Cmd-R. Do they come up on the same screen? Or was this an extra step you did? Again I dont know so I am just wondering if that is a possibility of where it went south for you…
Best of Luck to you!
Curious – how did you get to the step where you enter your Apple ID?
After erasing using the disk utility, you are presented with the same Recovery menu. Please fill in the steps taken to where Internet Recovery detected your previously ‘purchased’ version of Yosemite in your App Store account.
I just tried Robert’s simpler method, but it’s now downloading Lion instead of Yosemite. How do I get it to offer me Yosemite?
Yosemite is in my purchase history because after my first attempt which loaded Lion, I upgraded from Lion to Yosemite. I’m trying to re-install a 2nd time so I have a clean Yosemite-only install.
I was not asked for my Apple ID/PW during the install process.
Yosemite is sh*te
Great analysis, moron.
this helped nothing…
I concur. Having had to endure it for 2 months now I wish there was a way to install an older OS on this machine. However, it cam preinstalled with 10.10 so there’s not a damned thing I can do until the seemingly endless array of bugs are fixed.
Finder – problems with refreshing contents of directories/windows.
Mail – problems displaying new mail in IMAP accounts.
Safari – problems displaying some web pages.
File Browsers within apps – sometimes you can’t multi-select files, sometimes you can. Just changes on a whim.
System Prefs – reset themselves when they feel like it. Sometimes the Volume decides to unmute. You only notice when you get a ridiculously loud notification from mail that a new message has arrived.
Language Menu – randomly switches to another input language if you have more than one in use. I mean, just completely randomly. You can be typing in English one minute, go to make a coffee, then when you come back you’re suddenly typing in Arabic.
My 2 pence worth – stick with 10.9 if you can.
How can an OS possibly be Shiite Muslim? Ridiculous.
As far as Yosemite, and now El Capitan, causing issues, given that the machine the OS X is being installed on is compatible, most issues are caused from poor installation (including migration) and/or applications compatibility issues. However, some issues may also be due to current OS Xs simply being much more efficient, placing a greater load on older desktops because because current OSes are, or are attempting to, get legacy applications to perform to greater capacity, more efficiently.
E.g. we’ve noticed more issues since upgrading to El Capitan. SSD errors developed, completely unrelated to El Capitan or, at least, not directly related to El Capitan. SSD diagnoses showed impending drive failures, not visible to Disk Utility. AHT showed only a non-descript error code of “4HDD/11/40000000: SATA(1,0)” which could be due to any number of problems, including logic board failure. Further in-depth tests produced error reports on those SSDs (Samsung, SanDisk). Heavy and more frequent writing, in heavy workload environments, due to El Capitan’s efficiency and power placed too much stress on retail drives (used for OS and apps).
Solution? Upgraded drives from retail versions to business class (data center). Results? No more issues. El Capitan operates flawlessly and all applications operate at lightning speeds. Oh, and the Mac Pros range from 2008 to 2012.
OS X Yosemite runs better as a clean install and it seems to install faster too. I know it’s a pain to do, and it’s best for those who actually know what they’re doing, but the fresh start is a good idea from time to time anyway.
For me all my apps are from the App Store, and music is from iTunes and stored on an external drive. So I just copy my important files to a thumb drive, clean install, copy back, and re-download my apps. It takes several hours to complete, but the performance is worth it.
PS: The hard to read grey thin font in Yosemite is the worst part.