How to Adjust Light & Color of Photos on iPhone & iPad Precisely
![]() The Photos app in iOS includes a variety of excellent built-in editing features which many iPhone and iPad users are not aware of. One particularly great Photos feature is the ability to easily adjust color and light levels of any picture on the device within the photo library.
The Photos app in iOS includes a variety of excellent built-in editing features which many iPhone and iPad users are not aware of. One particularly great Photos feature is the ability to easily adjust color and light levels of any picture on the device within the photo library.
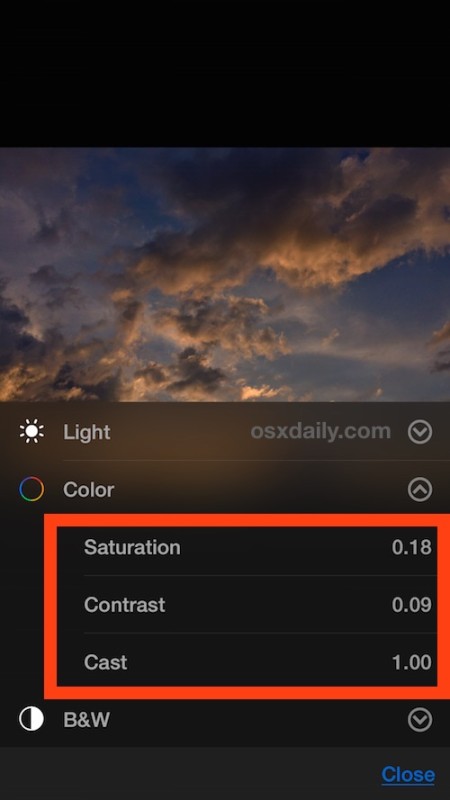
The Color and Light adjustment tools allows fairly precise control over photographic elements like saturation, contrast, cast, exposure, highlights, shadows, brightness, black point, intensity, neutrals, tone, and grain. The end result can be a picture that looks professional and beautifully adjusted, but completed in just a few seconds and entirely on the iPhone, iPad, or iPod touch, with the built in Photos app – without having to import or edit the image into another app.
These color and light editing functions are easy to use, but somewhat hidden by default, and many users who first encounter the feature may not realize that the Light, Color, and B&W options are actually entirely adjustable menus of adjustments. Photo editing features will be the same on any iPhone, iPad, or iPod touch running a modern version of iOS. Let’s walk through how to make such adjustments with any picture in the iOS Photos app.
How to Make Precise Color & Light Adjustments in Photos on iOS
This walkthrough is demonstrated with an iPhone picture of sunset clouds:
- Open the Photos app in iOS if you haven’t done so yet
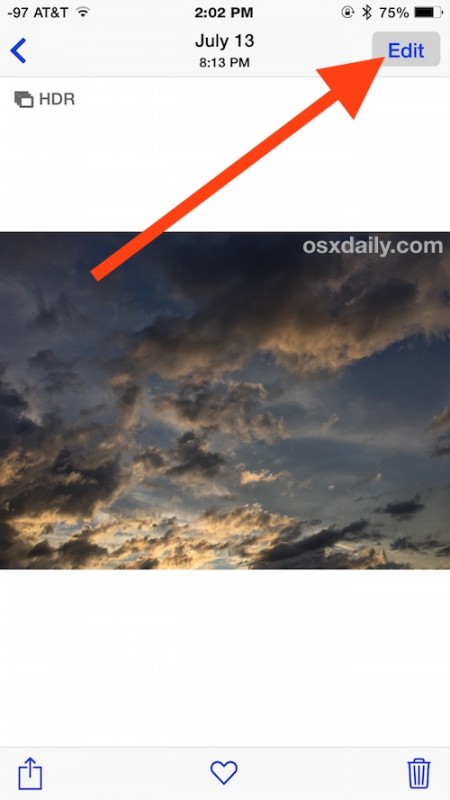
- Select a picture you want to adjust the color and light for, tap on that picture again so that you can reveal the “Edit” button and choose that
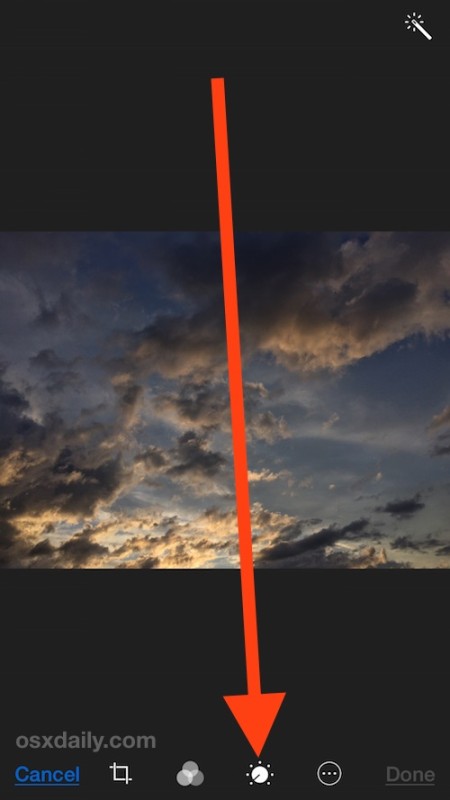
- Now choose the little dial button in the Photos app Edit screen
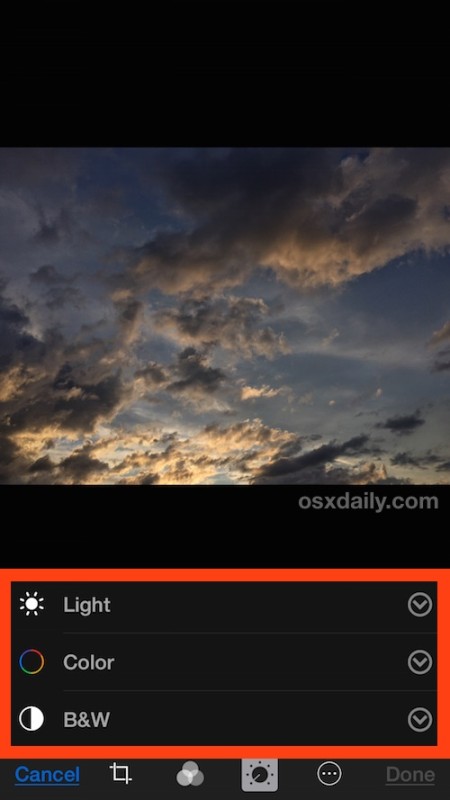
- You’ll now see a menu with three options: Light, Color, and B&W – tap any of these to reveal a submenu of each detailed adjustable item
- Choose one of the submenu adjustable options by tapping on it
- Now tap on the little preview image timeline near the bottom of the screen, slide left or right to change the intensity of the adjustment as you like (moving to the left tends to reduce the intensity or remove the adjustment, moving to the right tends to increase the intensity or enhance the adjustment)
- When satisfied with the changes to light and color, tap on “Done” to save the changes to the photo, where it will appear in the Photos app as usual along with the other images
![]()


Here’s a sample before and after of adjustments made to a colorful sunset casting light on clouds in the sky. It’s a subtle adjustment of saturation and brightness, but it makes the image really pop:
This is an excellent way to adjust photos and have them look much more professional or just slightly enhanced, or even very dramatically altered but with precise control over what you want to stand out and how it should look. That detail level and precision is particularly helpful compared to the pre-made Photos app filters in iOS, which can sometimes look a bit garish or over processed with some images.
The Photos app in iOS is becoming increasingly powerful and full featured, with a ton of built-in editing and adjustment features that are all available to the iPhone, iPad, and iPod touch user. You can do everything from straighten images, crop, rotate, remove red eye, add filters and remove filter colors too, or turn a picture black and white. Combined with the increasingly amazing camera that is included in each iPhone and iPad, it’s no wonder Apple is emphasizing the device as a powerful camera and capable photography tool, with the iPhone able to replace many peoples digital cameras entirely.
The iOS Photos edit feature exists on all modern versions of system software for iPhone, iPad, and iPod touch. If you don’t have the options available, you likely need to update iOS to a newer version.


Wish that the Ipad Pro would just take a picture of the scene as it is. Instead of the beautiful orangey sunset with a darkened sky, the device showed a yellowish sunset, garish looking, with a lightened sky. Really disappointing!!
How amazing that you wrote that yesterday. I am here for the very same reason. That sunset was the best ever, and I have been taking photos of sunsets for several years. What a shame that the intense rich peachy cloud turned out so yellow and bright!
I still have my old iPad2 so next time there is a sizzler I shall take 2 photos to compare. In the meantime I will try to photoshop back to some semblance of the real beauty.
Good discussion, but…
It is imposable to precisely adjust colour balance, exposure and contrast when set against a glossy black background.
Apples interface designers lack basic knowledge of Apples own interface guidelines or graphic design.
Sure a little random exploration of alternative schemas makes sense, to keep things fresh, but throwing carefully researched guidelines out permantly just to copy the worst aspects of a competitors interface is daft, and counterproductive.
So try stark white, and forty shades of white to grey for an initial release, then fix the interface by checking it against the Apple Human Interface Guidelines.
Cool — I didn’t even know those features were built in. I think the last time I checked was like 4 years ago, and there wasn’t much there, iirc. I especially could make use of the straightening tool.
This is quite nice, didn’t know about this as an iOS editor, I thought it was just an EXIF reading. Matches Photos on the mac quite well too. Good deal.