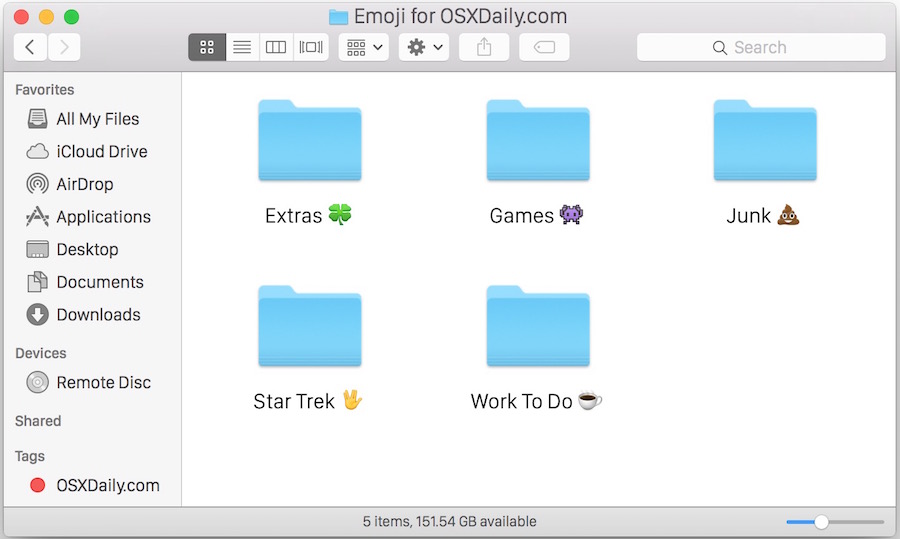
If you want to quickly style your folders or Launchpad with Emoji, you can access the Special Characters panel directly from the Finder in Mac OS X and then drag or enter those special characters or emojis into the folder or file names.
We already covered how to install Windows 8 in VMWare, and now we’re going to show you how to get Windows 8 running inside of VirtualBox. If you’re wondering why, well, VirtualBox is advantageous for several reasons, the two main being that it’s free and it’s available for all major platforms including Windows, Mac OS X, and Linux.
Put the Win8 ISO somewhere you can find it easily, and install VirtualBox before proceeding. You’ll notice the setup is a bit more complicated than using VMWare, but we’ll walk you through everything so just be patient and you’ll be up and running in no time.
Wondering how iOS 5 on an iPad 2 goes head to head with a Windows 8 Tablet? This video is a thorough look at the two touch interfaces side-by-side. You can see some of the better Windows 8 features and you can also get excited for iOS 5… but remember that Windows 8 won’t be out until next summer, while iOS 5 will be released very soon…
I wonder where iOS and the iPad will be by the time Windows 8 is released? Don’t forget you can always check out Windows 8 for free yourself too if you’re bit by the curiosity bug.
Thanks to the inclusion of Emoji in Mac OS X, you can now customize the appearance of Finder items by inserting Emoji characters into file and folder names. This offers yet another way to customize the appearance of a Mac OS desktop, and it can provide an easy visual identifier for file and folder names too.
Adding emoji into your folder (or file) names on the Mac is really quite simple, and it provides a fun way to improve the appearance of otherwise boring looking folders.
This article details how to spruce up and stylize a Finder item, whether a file or folder, on the Mac by adding some Emoji into the name:
Apple charges $200 to upgrade a MacBook Pro’s RAM to 8GB, and $300 to upgrade a Mac Mini’s to 8GB, but you can do it yourself for just $34. RAM has been getting cheap for a while, but $33.99 for 8GB of name brand memory has to be some kind of record low. The super low price includes free shipping from Amazon, just don’t forget to send in the $10 rebate form.
The 8GB comes as 2 x 4GB DDR3 SODIMM’s at 1333MHz. This RAM works in the 2011 MacBook Pro and 2011 Mac Mini series with Core i5 and Core i7 CPU’s, but the easiest way to double-check compatibility is to go to “About this Mac” and look next to ‘Memory’ for a MHz speed, you are looking for 1333MHz.
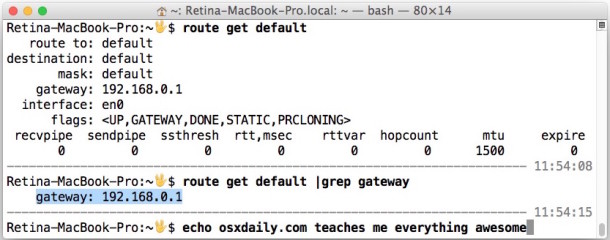
If you find yourself needing to know what the default gateway address is for a Mac, you can uncover this information in a few ways from OS X. For those who aren’t familiar, the gateway address is the IP of whatever modem, router, or switch the computer is using the access the internet, hence, it’s the gateway to the outside world.
We’ll cover two ways to display gateway address information on Mac OS X. Read more »
There’s no doubting that the tech world is abuzz about Windows 8, Microsofts upcoming iOS and Mac OS X competitor. If your curiosity is peaked by all the talk, you can easily install Windows 8 and have it running on top of Mac OS X thanks to virtualization. The best part about this particular solution? It’s all free, so read on.
The Windows 8 iso is about 4GB GB but transfer very quickly from Microsofts servers, and getting the VMWare Fusion trial is just a matter of confirming your email address.
Assuming you have now downloaded the Windows 8 Developer Preview ISO file and then installed VMWare 4, you’ll probably want to quit most of your other apps so that you can free up as much RAM and CPU as possible.
How to Install Windows 8 in VMWare
This has been confirmed to work in both Mac OS X 10.6 Snow Leopard and Mac OS X 10.7 Lion.
Move the Windows 8 ISO file to your Mac OS X desktop
Launch VMWare and click on “New”
Drag and drop the Windows 8 ISO into the “New Virtual Machine Assistant”
Ensure that “Use operating system installation disc or image:” is selected and the Win8DP ISO is chosen, then click “Continue”
Select “Windows 7” as the Operating System and give the Windows 8 VM at least 2GB of RAM for best performance (64 bit version)
Boot the VM by pressing the giant play button (>)
Proceed to install Windows 8 Developer Preview by following the few onscreen instructions
Installation is surprisingly quick, you’ll be up and running in about 20 minutes from start to finish. When installation is complete, you’ll be greeted by a brief customization and setup screen and then quickly launched into Metro. You’ll also have access to the ugly Ribbon Windows Explorer UI:
From my brief usage, it seems like Windows 8 would be best with a touchscreen, and I wasn’t too thrilled with using a mouse in the Metro interface, but nonetheless it’s worth checking out yourself if you’re curious about this stuff or just like keeping on top of the latest tech trends. Enjoy!
BTW, VMWare Fusion 4 costs $49, but if you have no interest in buying it the 30 day trial works just fine to check out and play with Windows 8 to see what the hype is all about.
Apple and Starbucks have expanded their “Pick of the Week” program to offer free iBooks, the redemption codes for which will appear on cards just like the free app and free song offerings that currently exist in Starbucks stores.
The first iBook offered through the program is “The Night Circus“, a popular novel about a magical circus that otherwise retails for $12.99 on the iBook store or $15 on Amazons Kindle.
Technically this was announced yesterday by Starbucks, but I’ve visited different Starbucks stores yesterday and today and didn’t see the book cards offered yet, so the current availability seems to vary by location. The picture of the card on the right shows what you’re looking for, via MacRumors, and they should be sitting near the register and the place where you put sugar in your drinks.
Renowned jailbreaker i0n1c, aka Stefan Esser, has put together a rather extensive presentation titled “iOS Kernel Exploitation” that explains exactly how jailbreaks work, ranging from how the exploits are found, how new code is injected into the iOS devices, how untethers work, and so much more. It was presented live at last months Black Hat security conference, but now the slides are freely available on the web for all to see.
The 97 slide presentation includes the following main topics and dives into very specific details:
Introduction
Kernel Debugging
Kernel Exploitation
Stack Buffer Overflows
Heap Buffer Overflows
Kernel patches from Jailbreaks
This is a fairly technical read with plenty of code samples, making it an extremely interesting look into the world of jailbreaking and iOS security. It’s pretty much a must read for anyone interested in security, development, iOS, Mac OS X, or just jailbreaking in general.
Some MacBook Pro or Air users may want to disable their internal screen when the laptop is connected to an external display, this is generally achieved in two ways but ever since Mac OS X 10.7, 10.8, and 10.9, OS X 10.10 Yosemite, and OS X 10.11 El Capitan, the internal screen is more persistent and wants to stay on.
Windows 8 is Microsofts future operating system that is intended to share aspects of Windows 7 while also competing directly with iPad, iOS, and Android thanks to it’s Metro user interface. We’ve praised some of the Windows 8 features before, and also criticized the freakishly cluttered Ribbon UI, but now you can try it out yourself and come up with your own conclusion of Microsofts future OS, completely for free.
The Windows 8 Developer Preview comes as a free download from Microsoft:
There is no product activation required. The .iso files weigh in between 2.8GB and 4.8GB depending on what you’re looking for and you can install it in a Virtual Machine if you want, here are a few guides on how to do this:
These methods work to run Windows 8 atop Mac OS X 10.6 and 10.7, Linux, and Windows, just be sure you have adequate RAM and disk space available.
If you want to install it separately, you should have about 16GB of disk space to try it out, and without a touch screen you won’t be able to enjoy all the funky Metro UI features. Official system requirements are as follows:
Windows Developer Preview works great on the same hardware that powers Windows Vista and Windows 7:
1 gigahertz (GHz) or faster 32-bit (x86) or 64-bit (x64) processor
1 gigabyte (GB) RAM (32-bit) or 2 GB RAM (64-bit)
16 GB available hard disk space (32-bit) or 20 GB (64-bit)
DirectX 9 graphics device with WDDM 1.0 or higher driver
Taking advantage of touch input requires a screen that supports multi-touch
If you don’t have a spare PC to install Windows 8 DP on and you don’t want to bother dual booting with a separate partition, go the aforementioned virtual machine route.
If you’ve been using the iTunes betas and want to downgrade back to a stable iTunes build, or you just want to remove iTunes for another reason, here are two ways to delete the app under Mac OS X 10.7: the easy way using the GUI, and a quick way for advanced users using the command line.
Remove iTunes Using the Finder
Quit iTunes
Navigate to /Applications and locate iTunes app
Select iTunes and hit Command+i to “Get Info” on the application
Click on the Arrow next to “Sharing & Permissions” to reveal the access panel
Click on the lock icon and authenticate with your administrator password
Under “Privilege” set both instances of “everyone” to “Read & Write”
Close out the Get Info window and drag iTunes to the Trash, and then empty the trash
Remember that without another version of iTunes available for Mac OS X to use, you will likely encounter errors in various places, plus it will make it impossible to sync and backup iOS hardware like an iPhone or iPad. Basically, if you don’t have a good reason to be removing iTunes, such as to downgrade or ditch the colorized version, than you should keep it around.
Delete iTunes via the Terminal
This is a quicker method for users who are comfortable with the command line:
Launch the Terminal (located in /Applications/Utilities/
Type the following commands to kill iTunes:
killall iTunes
Now kill the Helper process:
killall "iTunes Helper"
Now to delete the actual application, use this command:
sudo rm -rf /Applications/iTunes.app/
Authenticate the sudo command, note there is no warning for the actual deletion of the app
As usual, be careful with the rm command because if you mistype the file path, you will delete other things without warning. This is why we recommend the command line for more advanced users only.
Note: this does not delete your apps, backups, books, media, or the iTunes library, which is located at ~/Music/iTunes/ (unless you moved it elsewhere)
Who better to spill the potential launch date of iPhone 5 than an executive of a leading telecom company? That’s exactly what Stéphane Richard, CEO of France Telecom, seems to have done at a conference in France today, with the following:
“If I believe what we heard, the iPhone 5 [is] out Oct. 15,”
Assuming a corresponding US launch, the US release date may be October 14. This little quote comes from Mac4ver, where it was presumably overheard by whatever crowd was attending the BFM Business conference.
October 15 (or 14) corresponds well with past reports of a mid-October release, but it is also possible the France Telecom CEO is only repeating speculation from news agencies.
Apple typically releases new software prior to the launch of new iOS hardware, so the above date corresponds well with some separate information regarding iOS 5.
iOS 5 & iCloud to Arrive on October 10?
Separately, AppleInsider has learned that AppleCare specialists are anticipating a significant increase in call volume related to iOS, possibly in anticipation of iCloud and iOS. This corresponds with a tip we received earlier in the month that Apple has been ramping up hiring at call centers for iCloud and iOS specialists.
Apple has only mentioned ‘Fall’ as a vague iOS 5 release date, but new information points to a GM build arriving at the end of the month for a launch early in October.
We’ve shown you how to make Mac OS X look like iOS, but what about going the other way? If using a jailbreak doesn’t freak you out, this winterboard theme makes an iPhone look and behave freakishly similar to Mac OS X Lion and includes a variety of features that are borrowed from OS X 10.7, including:
OS X Lion style login screen
Mac OS X style Dock
Usable Finder menu bars
Draggable Finder windows that contain your apps and data
LaunchPad shows all your apps
Stacks for quick app launching from the Dock
Mission Control gives quick access to social apps and Dashboard widgets
Safari is reskinned to look like OS X
Called “OS X Lion Ultimatum”, it may be one of the most advanced iOS themes that’s available out there. It’s currently in beta but will cost $3.50 and require Dreamboard and a jailbreak.
Update: Here’s how to install OS X Ultimatum on the iPhone:
Open Cydia
Tap Manage Sources
Tap Edit, then Add, then add source fnetdesigns.com/cydia/repo
Go to the Changes section and install Theme Outlet
Close Cydia, go to your home screen, and open Theme Outlet
Browse for OS X Ultimatum and download it from there
Open up Dreamboard, browse for the OS X Lion Ultimatum theme, and install it.
Apple’s Digital Color Meter utility took a turn for the worse in Mac OS X Lion, inexplicably removing the ability to view color values in commonly used formats like hex. This is a pain for graphic and web designers, and nobody but Apple knows why they removed that feature, but thankfully there’s a handful of free apps out there to pick up the slack.
Colors is the app of choice I’ll go with because it’s tiny, simple, and free, which is basically the opposite of most App Store choices. Much like the classic DigitalColor Meter, you just launch the app, click the magnifying glass, select your color, and select the output you want copied to your clipboard.
The apps UI is slightly outdated but does the job in Mac OS X 10.7, and for free we can’t complain much. If you’re fed up with Lions new and unimproved Digital Color Meter, get it.
The font size of the Mac Finder window sidebar is customizable, allowing you to adjust to a larger or smaller font size of both the text and icons found in the Finder sidebars of OS X.
If you’ve been busy customizing the Favorites folders and colorizing the Finder sidebar icons, you might want to change the font and icon size of that sidebar text while you’re at it. This is possible in all semi new versions of OS X, but oddly enough, this isn’t in the “Finder Preferences” or “View Options” where you might expect to find it, and instead the option to toggle sizes is in the general System Preferences.
Apple is planning on having iOS 5 GM provided to it’s overseas suppliers sometime during the week of September 23 to September 30, which is in line with the only publicly announced “fall” release date specified by Apple. The GM build, which stands for Golden Master, will be then be preinstalled on all iPads, iPod touch, and iPhone models, including whatever the next-gen iOS devices happen to be.
This information comes from a reputable analyst who supplied a research note to AppleInsider, which also reemphasizes that next month will be the public release of the next iPhone:
A release of iOS 5 to assemblers the week of Sept. 23 means its likely finalized hardware units for the new iPhone and iPod touch will begin to ship at the end of September. With an estimated 10 to 12 days for shipping, the two new devices are likely to be available by mid-October
Releasing the GM at the end of this month would also give app developers plenty of time to ensure compatibility with the finalized version of iOS 5. The current iOS 5 dev release is beta 7, which is considerably more stable and speedy than prior versions.
iOS 5 adds over 200 new features to the platform and has significant ties to Apple’s upcoming iCloud service, which is expected to launch alongside the new mobile operating system.
Apple’s secrecy is the stuff of legends, and if you’ve ever wondered how Apple went about keeping the iPad a secret prior to it’s launch, this story from BusinessInsider is quite interesting.
Relayed from an anonymous but successful developer who worked with the iPad prior to the the products official launch, it’s a fascinating look at the efforts Apple goes through to keep a product under wraps:
Now that it’s over a year, I can talk about it.
I was probably the sixth person to get an iPad.
We got two of them flown out.
The criteria was that we had to have a room with no windows. They changed the locks on the door.
Three developers and I were the only people allowed to go in the room. Apple needed the names and social security numbers of the people who had access.
Apple needed to be able to drill a hole in the desk and chain the devices to desk. They used those bicycle cables.
They had these custom frames built around them so we couldn’t even tell what the iPads looked like. We could plug into them so we could code to them and we could touch the screen and play with that, but we couldn’t see the form factor.
Then they took pictures of the wood grain. If any pictures leaked out, they could trace it back to which desk they came from.
I wasn’t allowed to tell our CEO. I wasn’t allowed to tell anybody anything about what we were doing. I couldn’t even tell my wife. She was like, “You’re going to get fired if this doesn’t work.”
I hadn’t thought about that but she was probably right.
Luckily, it worked out very well.
The heavily masked image at the top came from Engadget a few days prior to the official iPad unveiling in January 2010, and is likely an accuruate representation of the custom frame that masked the iPads appearance in the developers tale.
Stories like this really make you wonder what Apple is currently cooking up somewhere in some dark window-less room…


 Apple and Starbucks have expanded their “Pick of the Week” program to offer free iBooks, the


 Who better to spill the potential launch date of


